# GoGuardian
# Getting Started
##### Logging In
Go to [teacher.goguardian.com](https://wiki.mdy.org/teacher.goguardian.com "GoGuardian Teacher") and **Log in with Google**.
##### Classrooms
GoGuardian is integrated with Clever. Instead of creating your own classrooms, you will see **Pending Classrooms** in the left side of the dashboard. Your rosters are automatically synced so you don't have to add students. Anytime a roster change is made, it will automatically update in GoGuardian as well.
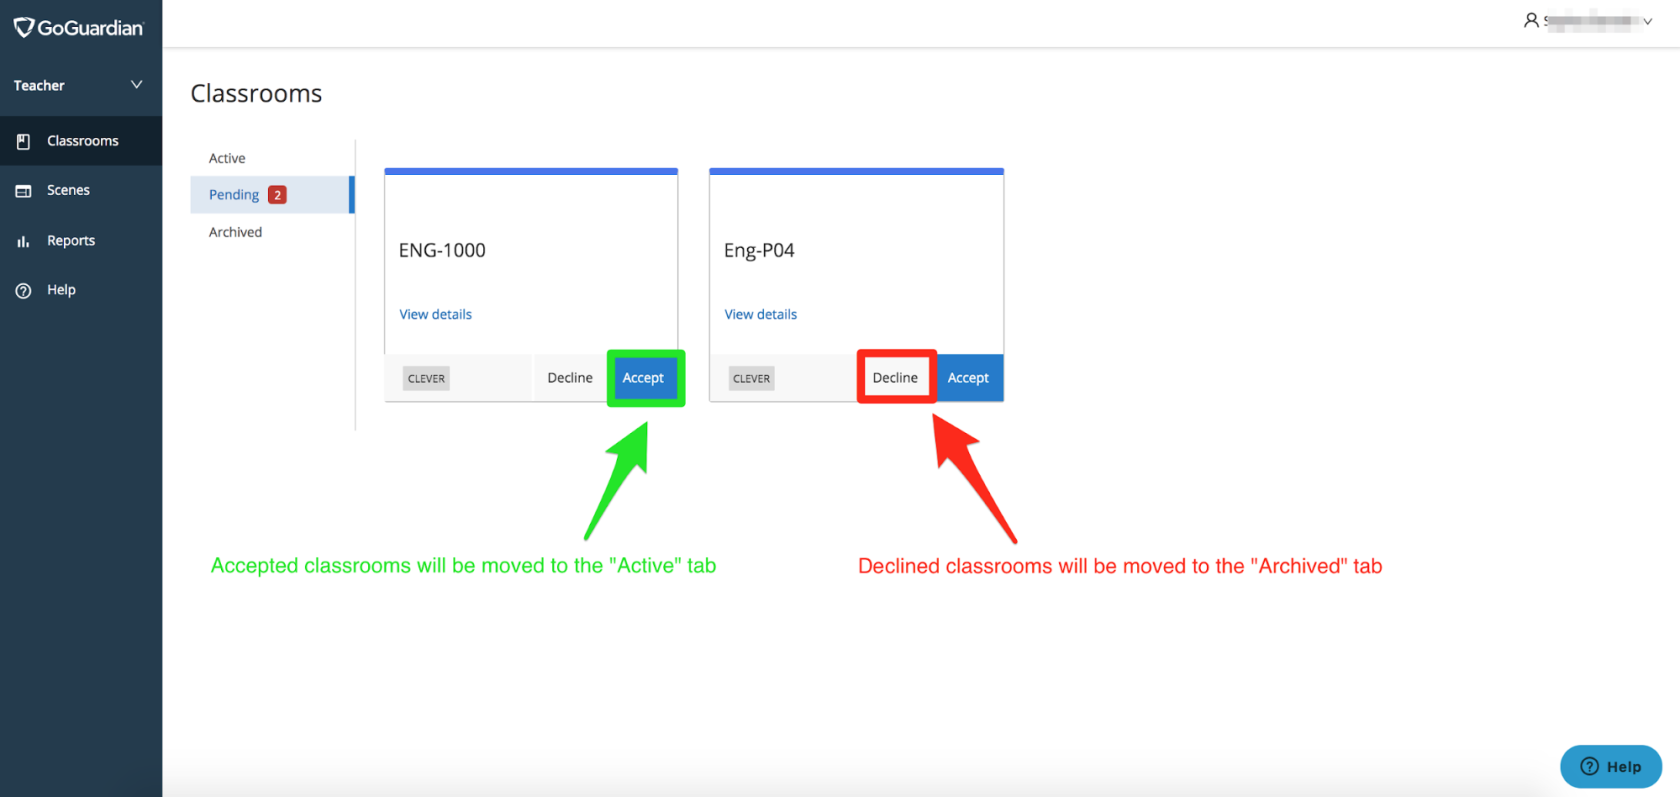
Select "Accept" so that the classroom will be added to the "Active" classrooms. Any fellow Teachers within that classroom will be able to see it in their account as well.
# Classroom Sessions
# Start and End a Classroom Session
A **classroom session** is the digital equivalent of a classroom period. When a classroom session begins, all enrolled students will automatically join.
##### **Starting a New Session (non-scheduled)**
1. To start a session, sign in to teacher.goguardian.com.
2. Select the session length or custom end time from the drop-down menu.
3. (Optional) set the Chat setting to "on" or "off" to enable or disable Teacher Chat at the beginning of class.
4. Click Start Class to begin the session.
**Protip:** Classroom sessions can also be scheduled to run automatically using the Calendar. For more information on scheduling automated class sessions, please check out [this article](https://wiki.mdy.org/books/goguardian/page/configure-a-classroom-schedule "Configure a Classroom Schedule") on Configuring Class Schedules.
#####
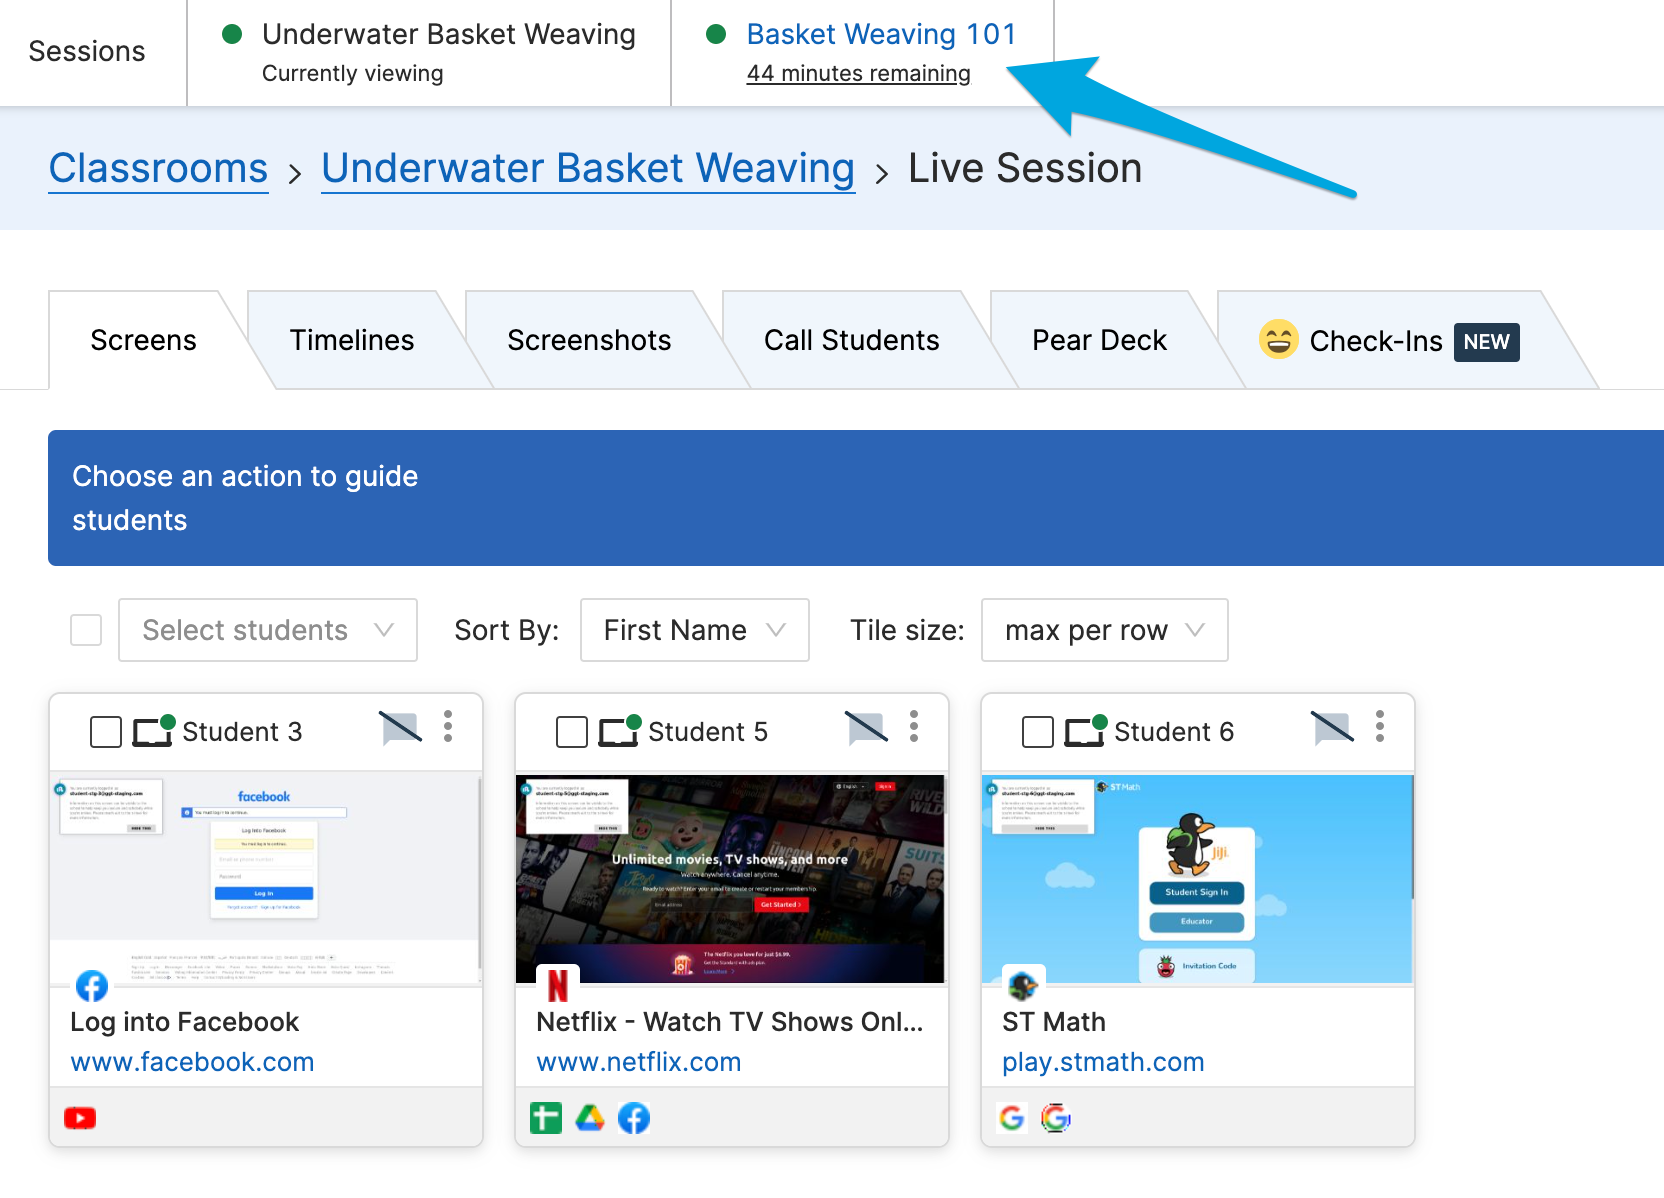
**Switching Between Active Sessions**
Multiple, concurrent sessions can be active at once. On the **Sessions** bar, click on any other active classes to switch between them.
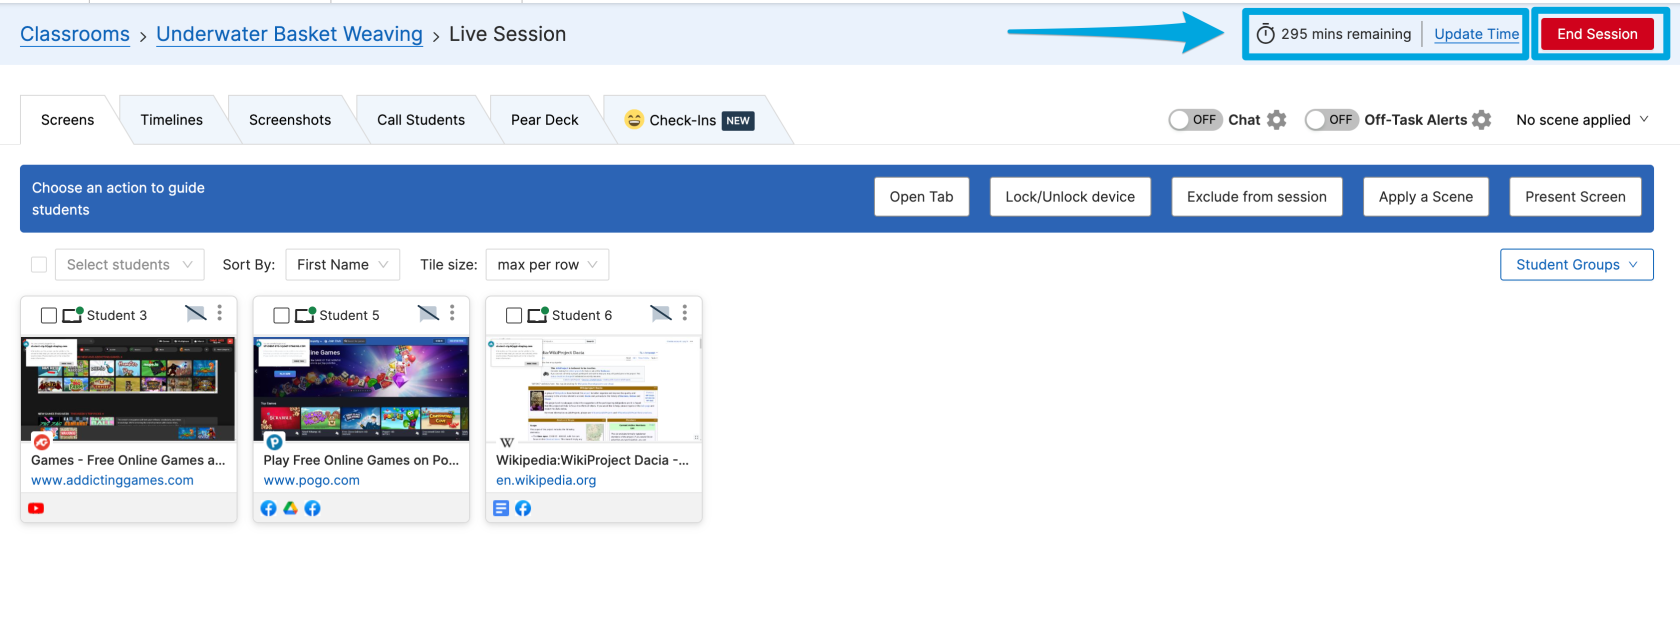
##### **Ending a Session Early & Adding Additional Time to a Session**
A session can be ended at any time by clicking the **End Session** button.
To **extend** a class session:
1. Click the **Update Time** button
2. Select the amount of time to extend the session or type in a new end time
3. Click **Update Session**
# Configure a Classroom Schedule
By configuring a classroom schedule, you can automate when classroom sessions start and stop. Classroom schedules can be configured to run multiple times a day and at different times throughout the week.
#####
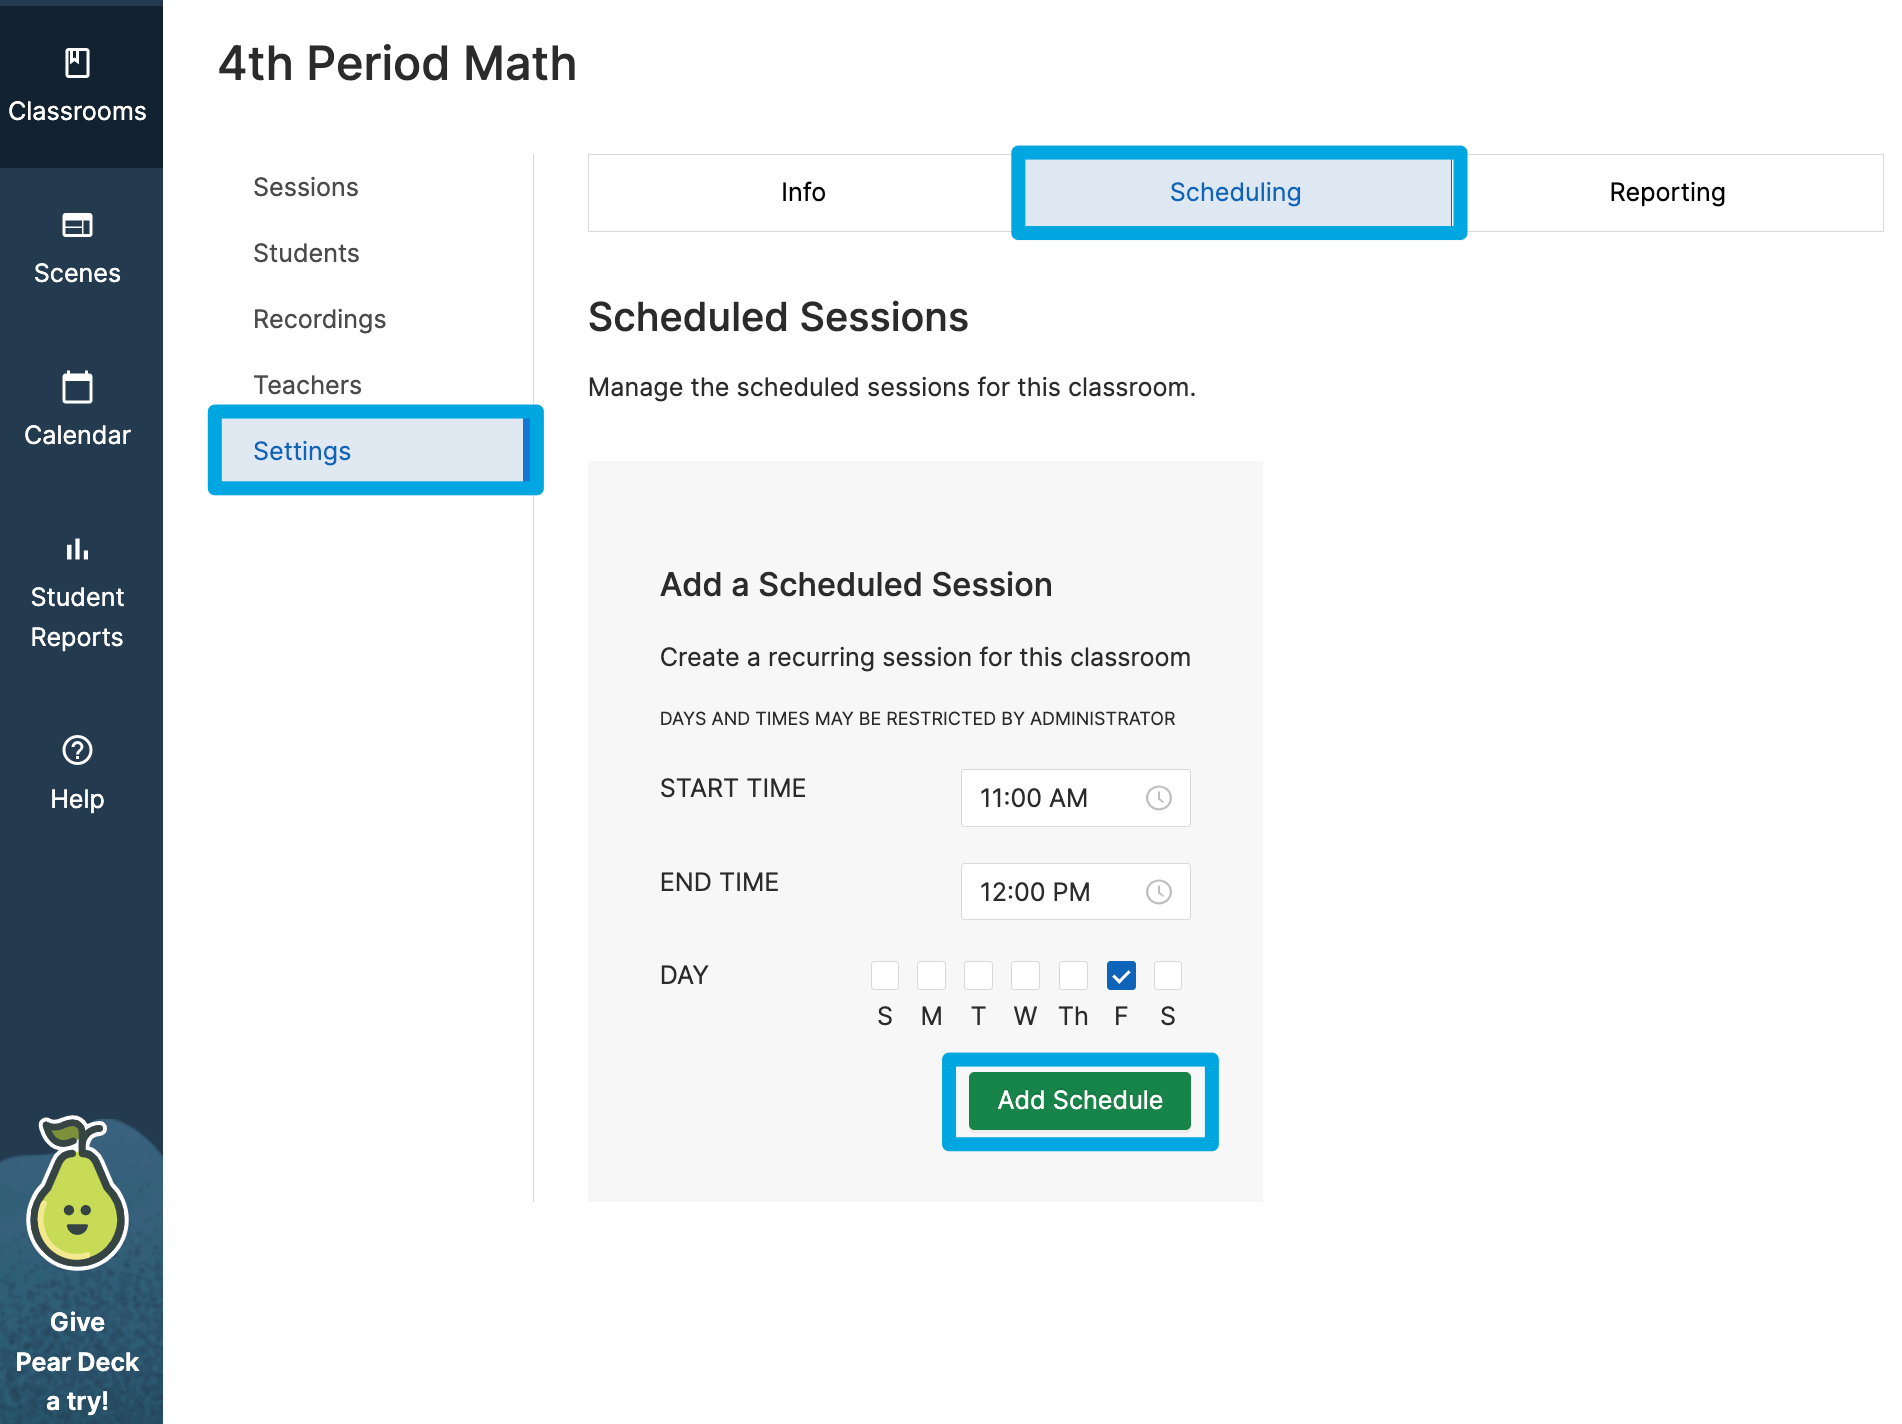
**Setting up a scheduled session**
To set up automatic class sessions for a specific class:
1. Select a classroom
2. Click the Settings tab
3. Click the Scheduling tab
4. Click the Add Schedule button
5. Select a start time
6. Select an end time
7. Select the day(s) of the week
8. Click the Add Schedule button
##### **Using the Calendar**
Automatic class sessions can also be managed by using the Calendar tab. The Calendar tab will display all actively scheduled classes as well as grant the option to Edit the schedule, cancel scheduled classes, or add a new scheduled class by clicking the "Add to Calendar" button.

##### **Pro-Tip: Set a reminder for yourself to turn off scheduled sessions before holiday vacations or at the end of the semester. This will prevent students from getting blocked by classes with default Scenes when they shouldn't be in session.**
# Viewing Past Sessions
Session data including student browsing history during class, Chat records, Screenshots taken by teachers, Student Check-Ins, and a log of Teacher Commands is automatically saved and can be accessed in the class session history at any time.
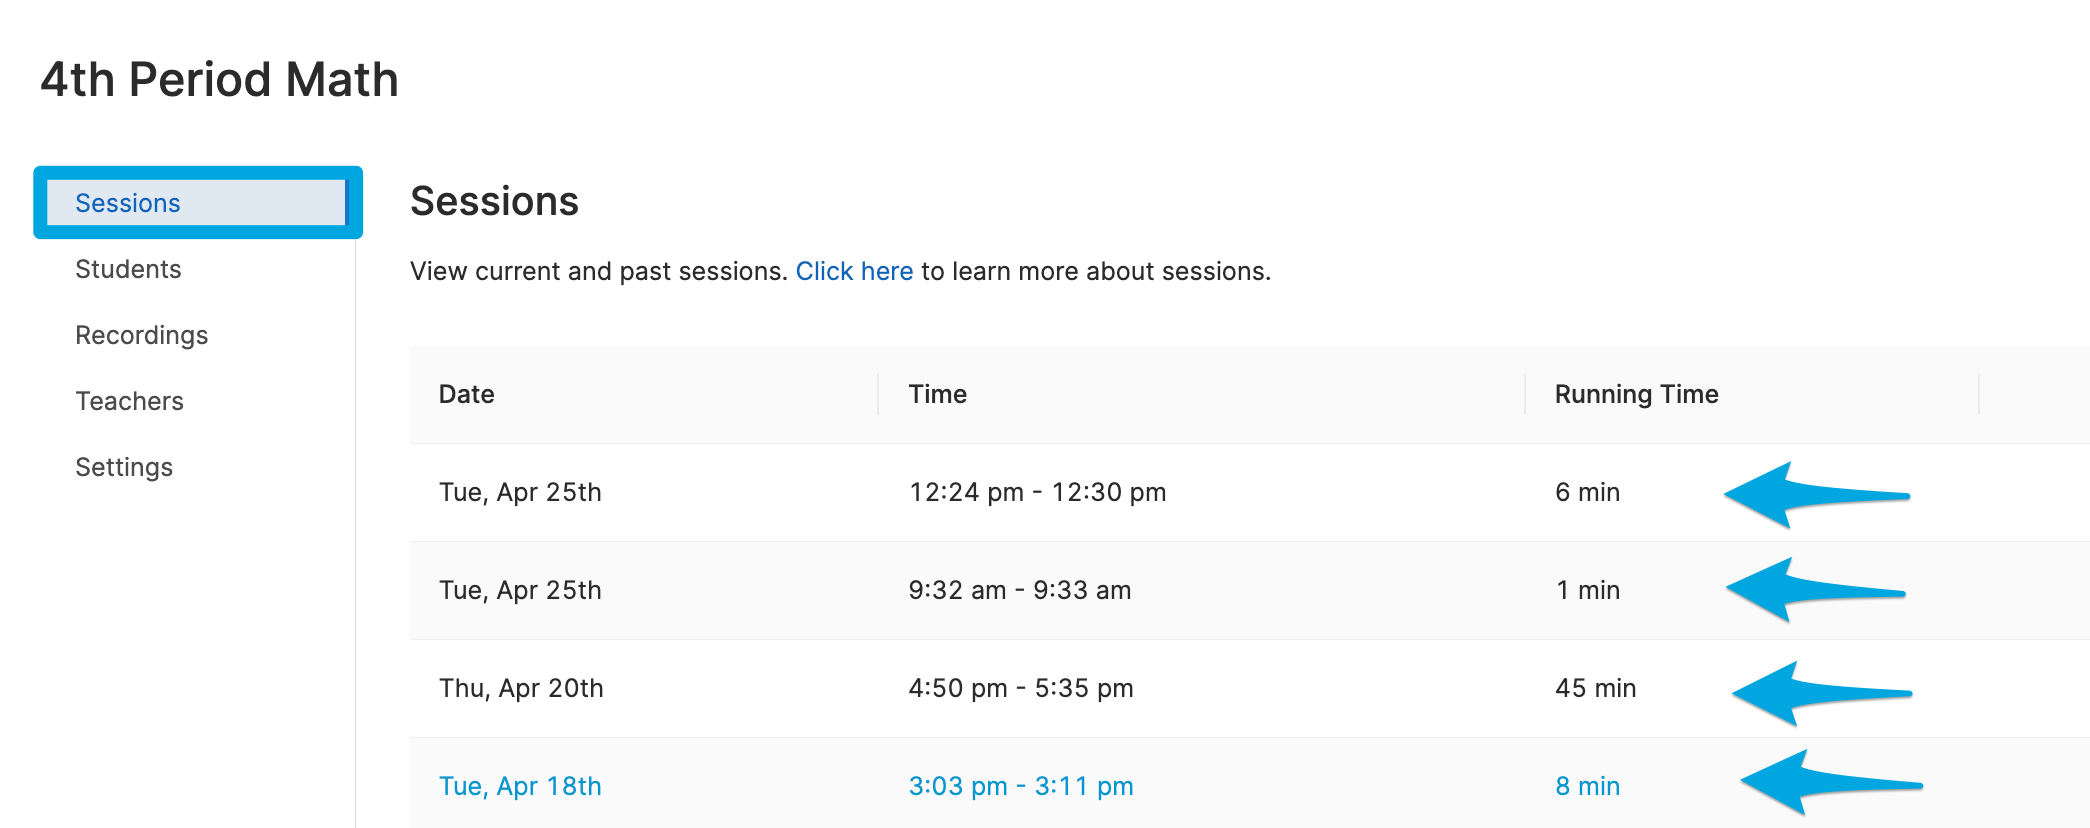
##### **To access previous class session data:**
1. Navigate to the **Sessions** tab by clicking on the class tile or the "View Sessions" option from the Settings cogwheel menu.
2. Under the **Date, Time, and Running Time** columns, click on the previous class session you'd like to review
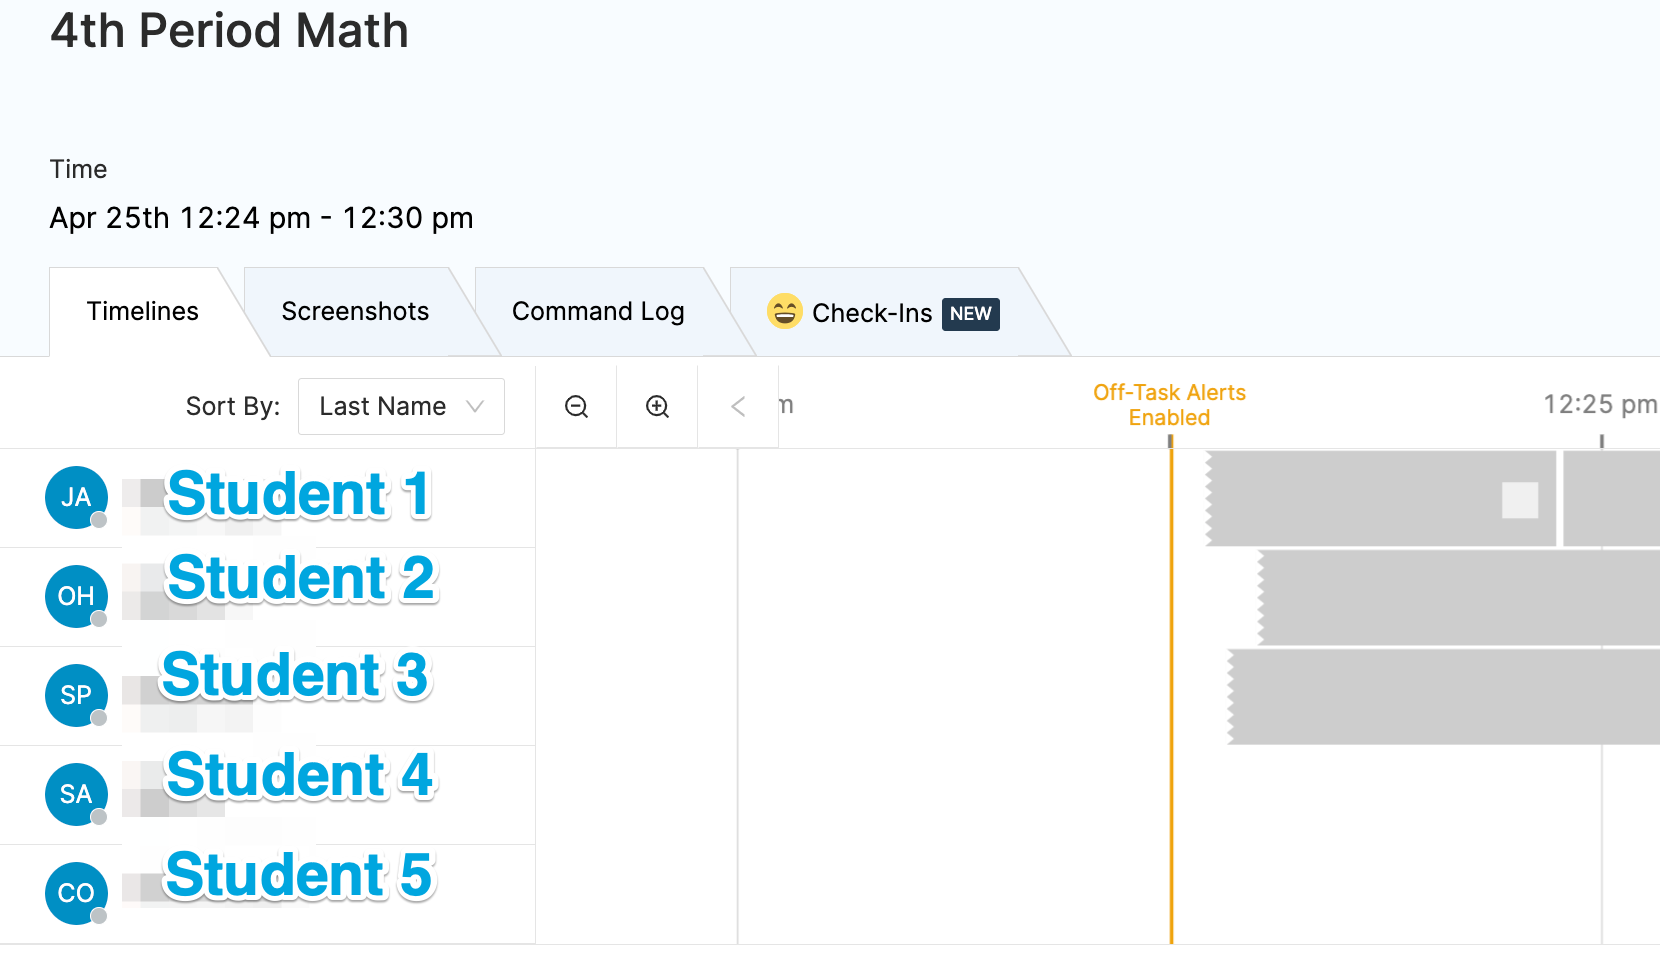
3. Select from the **Timelines, Screenshots, Command Log, and Check-Ins** tabs to sort by the respective data
# Scenes
# Scenes
**Scenes** give teachers added control over students' web activity during classroom sessions. Scenes can help teachers control which sites students can and cannot reach during their live classroom sessions. Scenes can either be
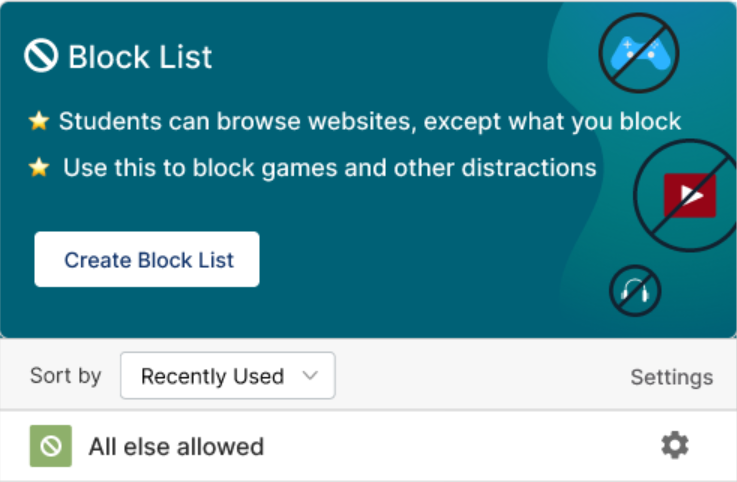
- **Blocked Websites List:** all websites are allowed except the websites on your list
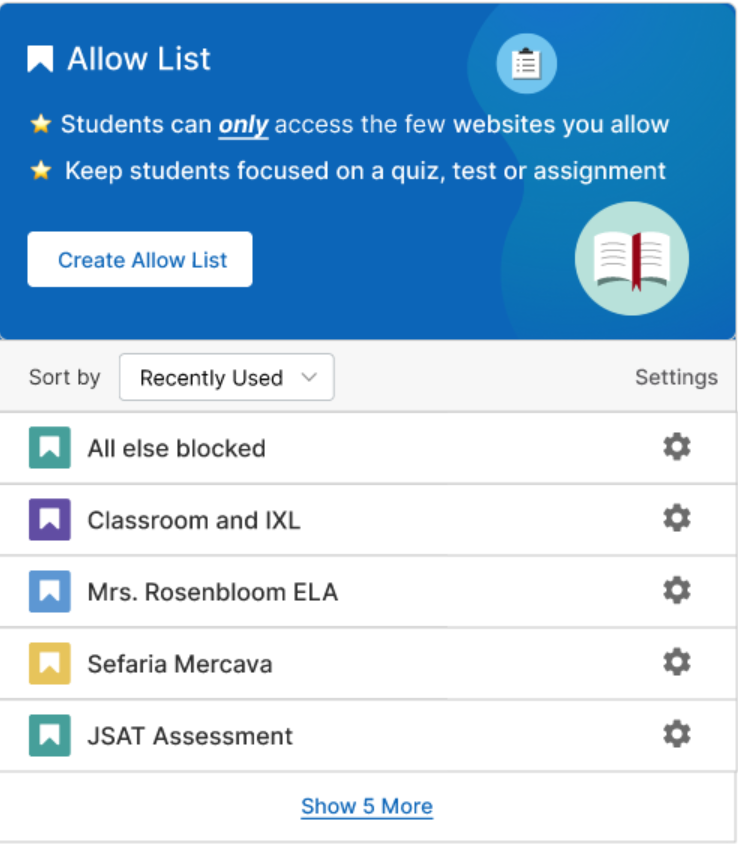
- **Allowed Websites List:** all websites are blocked except the sites added to your list
##### **Create a New Scene**
Start by clicking the Scenes tab in the left column.
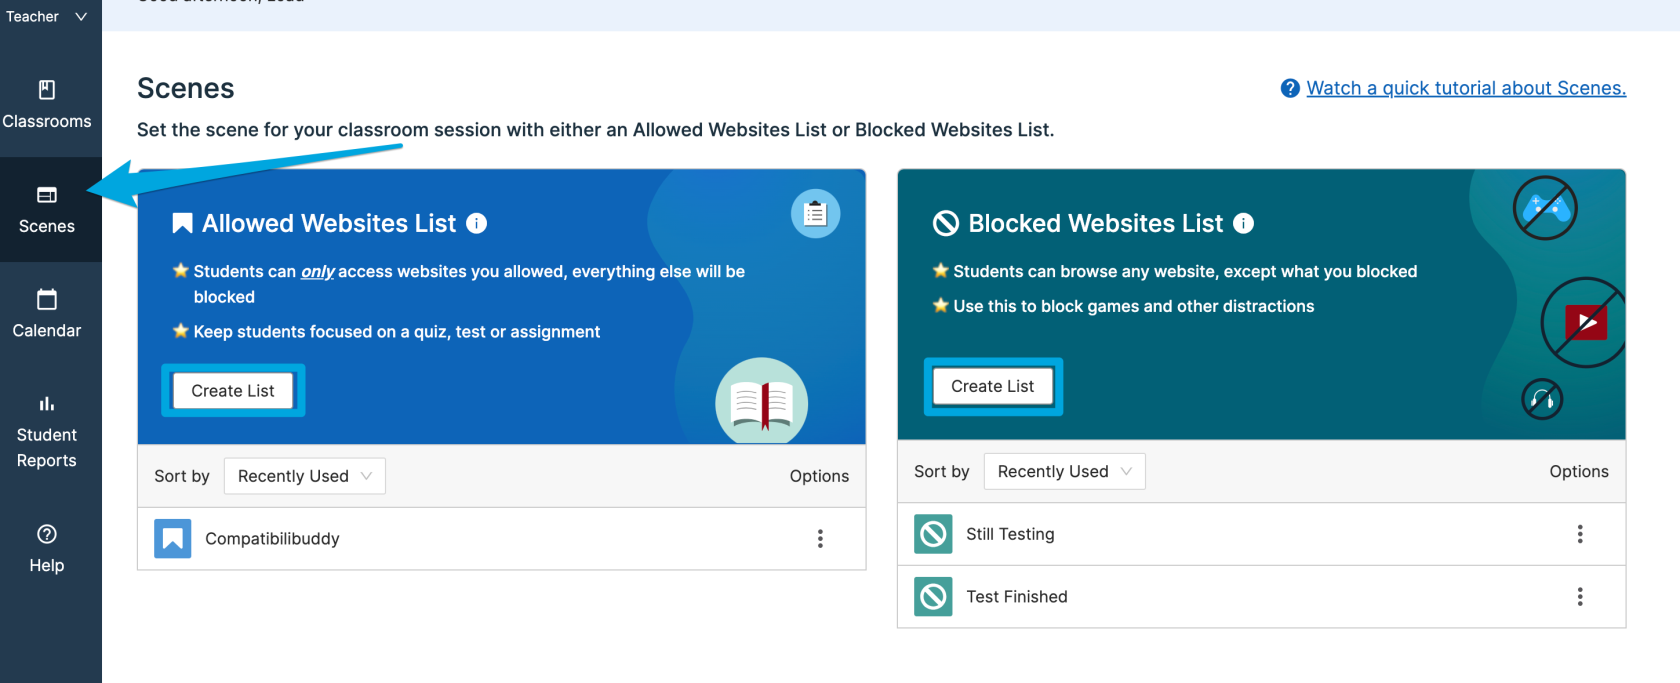
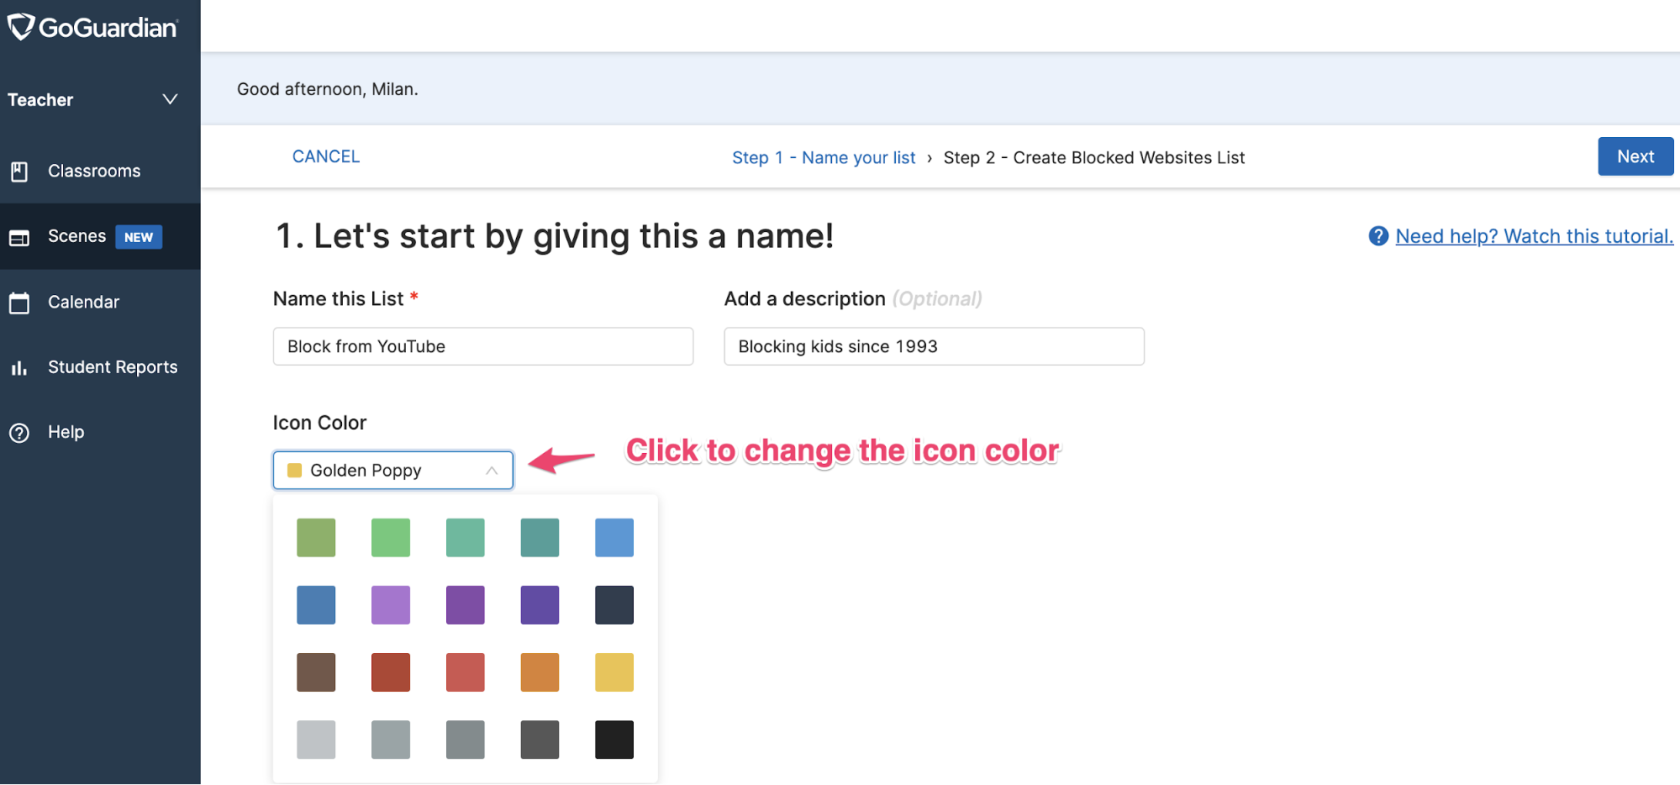
This will bring you to the main Scenes page. You'll be able to name your Scene, add a Description (optional), and choose the Icon Color (also optional). Click Next to move on.
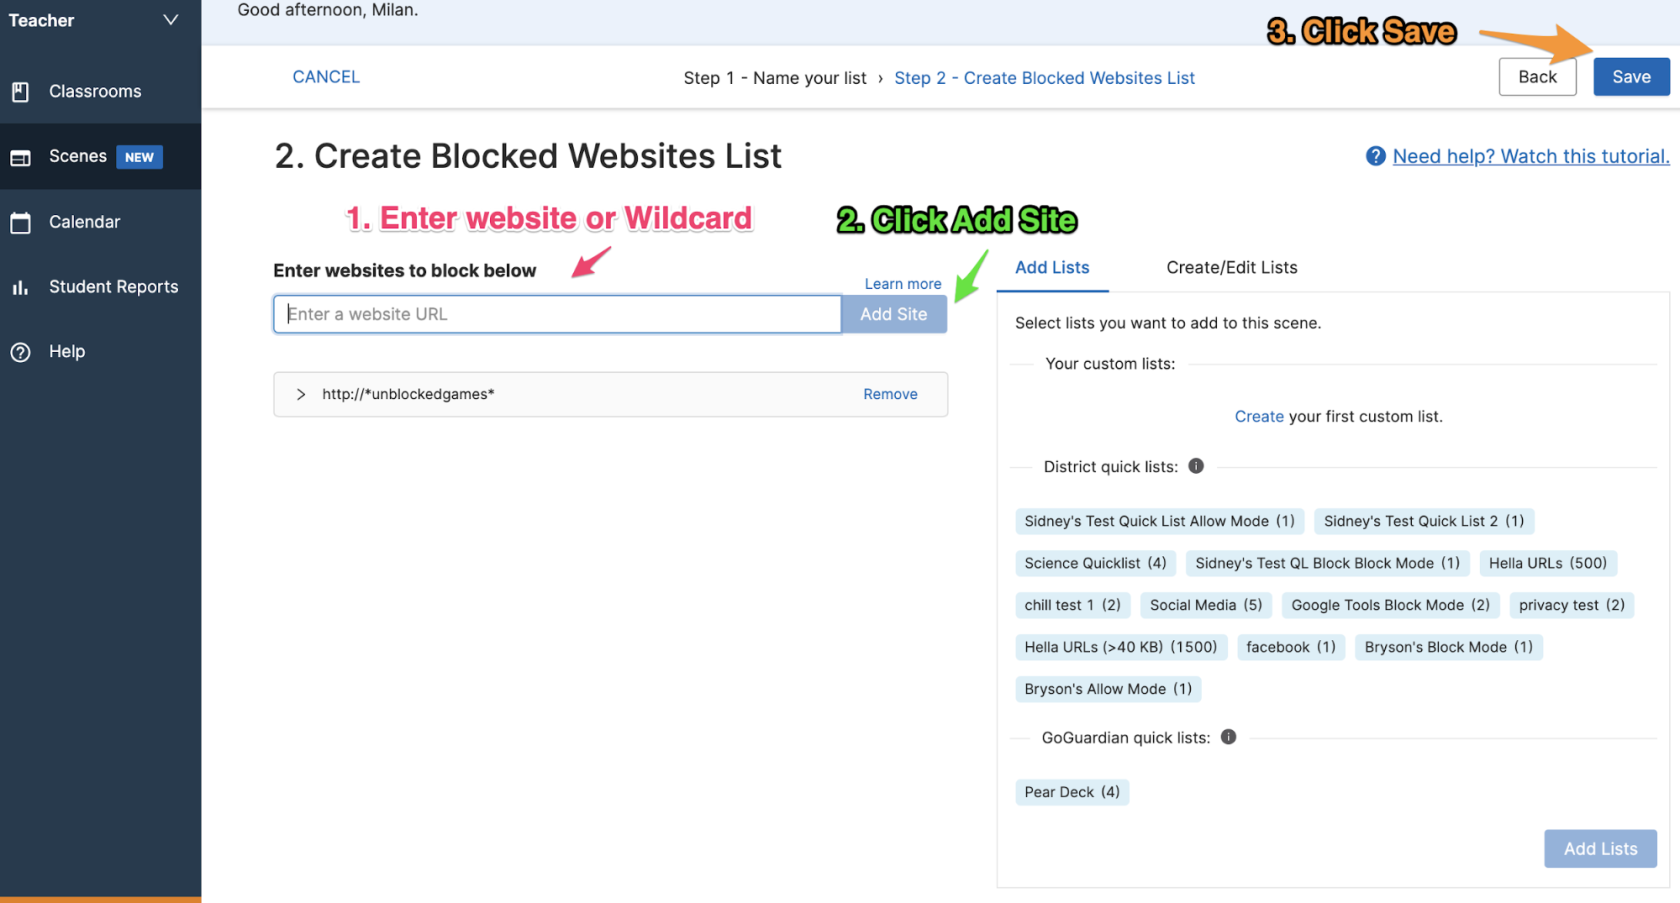
From this page, you can add the **website URLs or Wildcard** (URLs or terms) to be blocked. You can also add **Quick Lists** (found on the right by selecting the list to add and then clicking the Add Lists button at the bottom right). Once all sites have been added, click the **Save** button (at the top-right) to save your Scene.
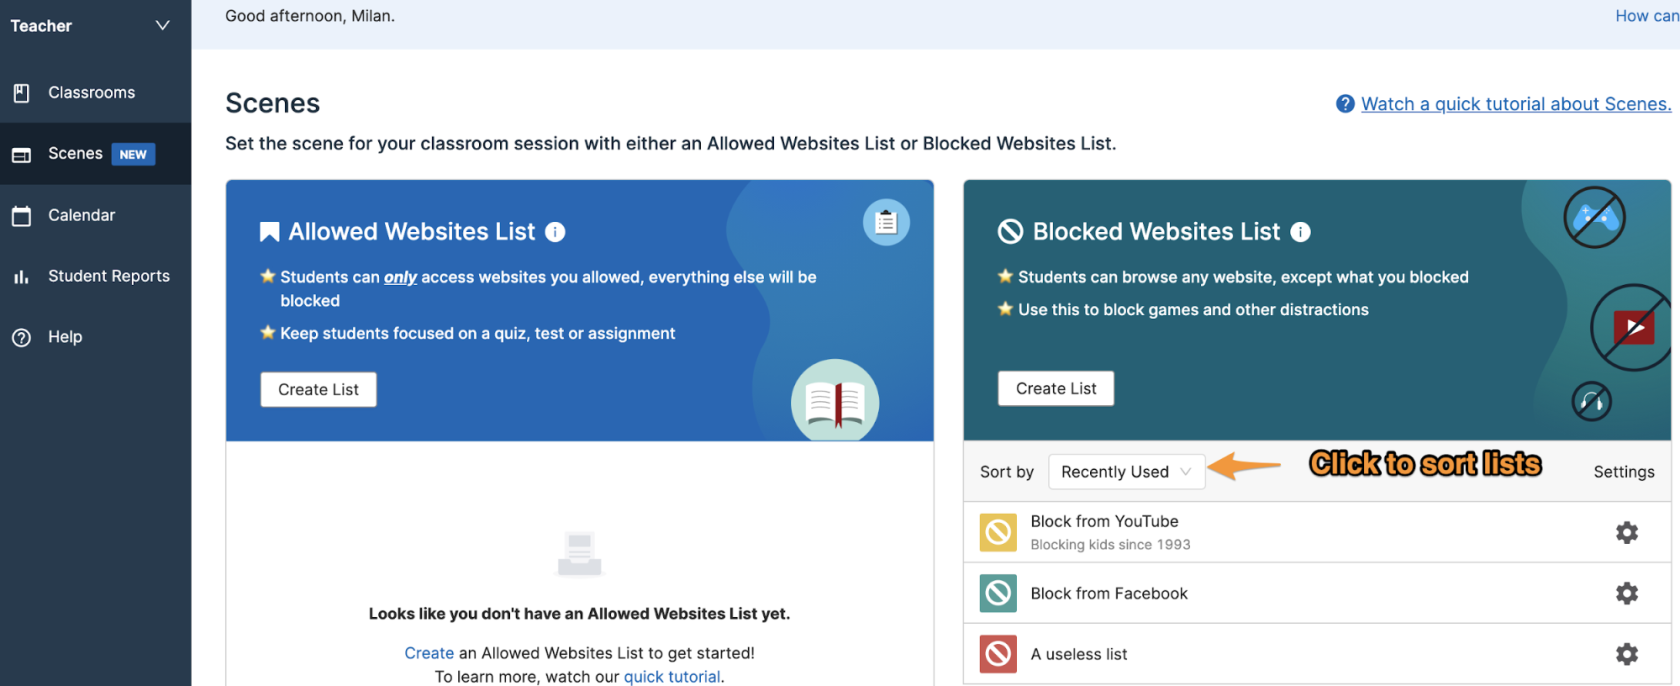
From this page, you can choose to create an Allowed Websites List or a Blocked Websites List.
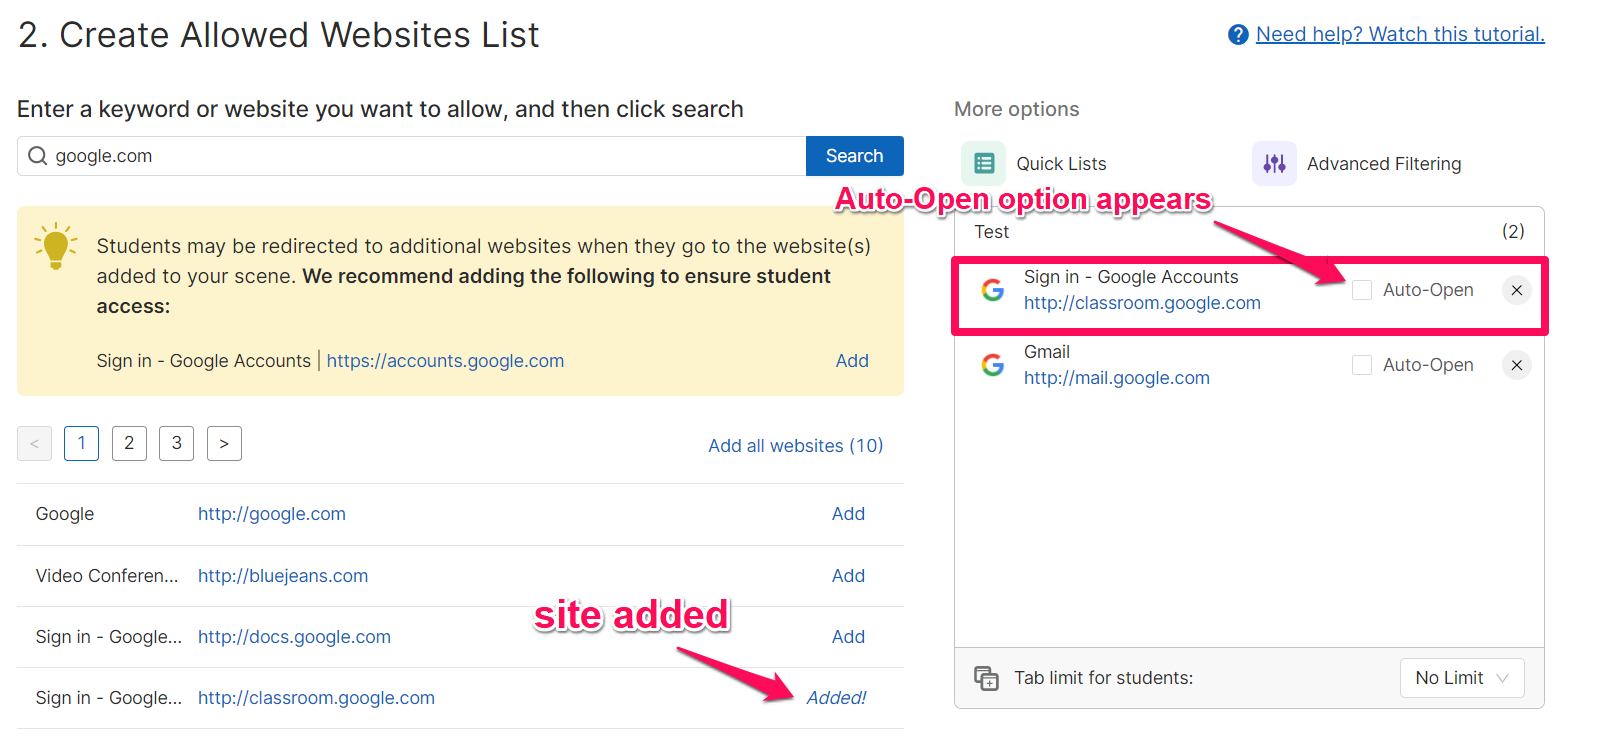
The **Allow List** website entry box looks like this:

The **Block List** website entry box looks like this:

##### **Creating Lists and Tab Management**
From this page, you can add the website URLs or Wildcard (URLs or terms) to be blocked or allowed.
You can also add **Quick Lists** (found on the right by selecting the list to add and then clicking the Add Lists button at the bottom right). Quick Lists are groups of URLs that can be quickly added or removed to your Allow or Block list. Quick Lists are typically used in Allow List scenarios.
Scroll down to the bottom of the page (or look at the right-hand side of the screen) to find the Tab Management options.
- **Auto-Open Tabs:** Create a list of tabs to automatically open at the start of the classroom session.
- **Maximum Open Tabs:** Set a maximum number of tabs that can be opened by students during the classroom session. No limit means a student can open as many tabs as they want or need. Once the tab limit is reached, no new tabs can be opened until a previous tab is closed or the tab limit is increased. By default, there is no limit set.

Once all desired changes have been added, scroll to the top of the page and click the **Save** button to save all settings for your Scene.
Your Scene will now appear under the panel that corresponds to the type of list created.
##### **Editing Scenes**
If you need to make any adjustments to your Scene (such as adding or removing sites, setting Auto-Open tabs, setting a tab limit, or renaming, duplicating, or deleting your Scene), you can do so by clicking the gear icon next to the Scene that needs to be edited. Then, you can select the desired option from the dropdown list.
#####
**Sharing Scenes**
Once a Scene has been created, the three dots next to each Scene will have a Share option. Selecting Share will open the Share Scene modal where additional teachers can be added via email address to allow them access to a shared, uneditable version of the Scene.
Teachers who receive the shared Scene will then see it in their list of Scenes with a Shared with me notice. Any changes made to the Scene by the owner will be updated in the shared Scene as well.
Although those with a shared version of the Scene will not be able to make edits, clicking the three dots next to the shared Scene will provide the option to Make a Copy of the Scene. A copied Scene can then be edited, applied to classes, or re-shared with other teachers as needed.
#####
**Applying a Scene**
If you would like to manually select the Scene to be applied before starting your session, click the Classrooms tab in the panel on the right and select the classroom to apply your Scene.
Scenes can also be applied to active Teacher sessions or set as the Default Scene to apply any time a new session is started.
#####
**Applying Scenes in Active Sessions**
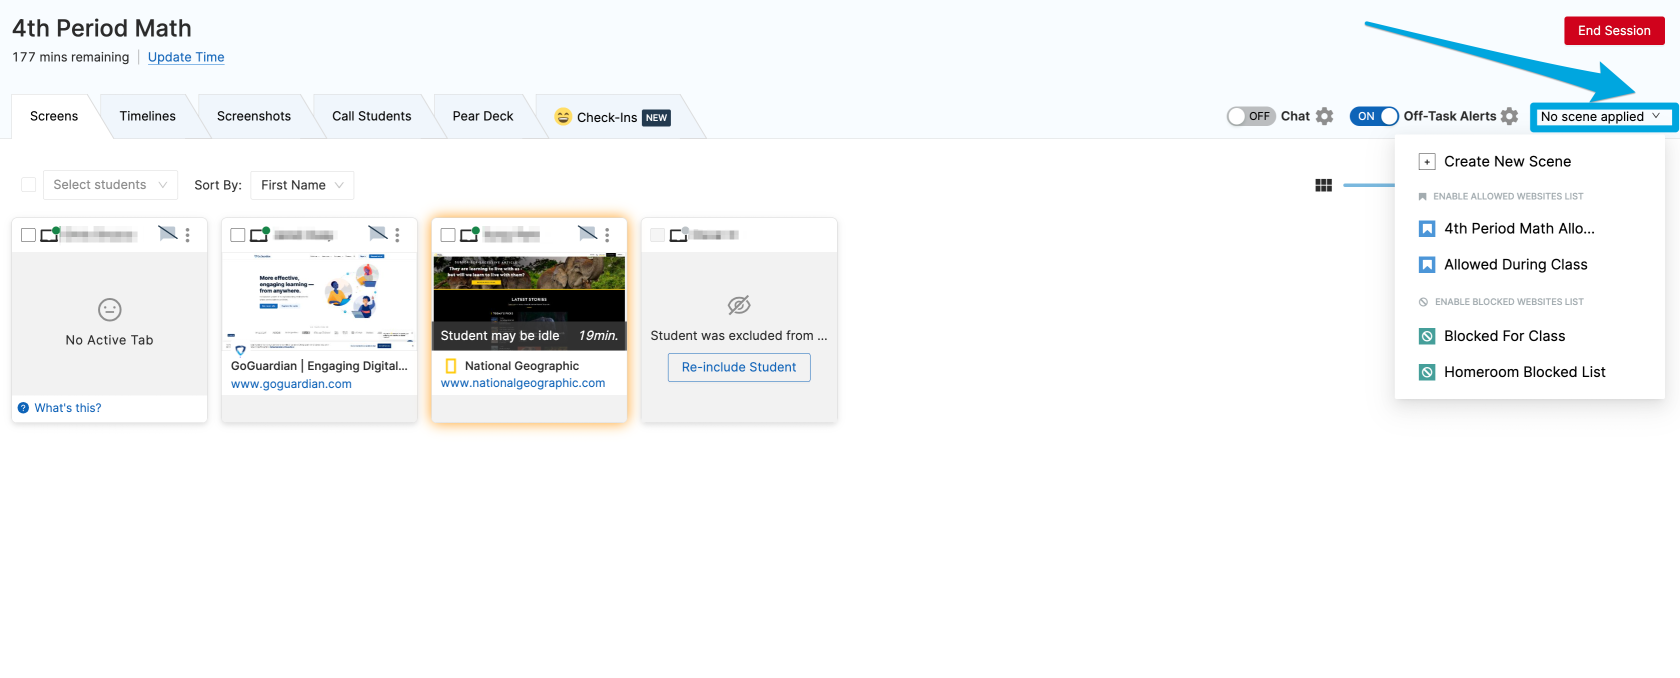
- Click on the **"Scene Status: "** button at the top of your active session. When hovering over this button, the text will change to **"Change Scene"**
- Select the Scene you wish to apply. The "Scene Status: " button will change to include the name of your Scene. If no Scene is applied, the text will display "Scene Status: No Scene"
#####
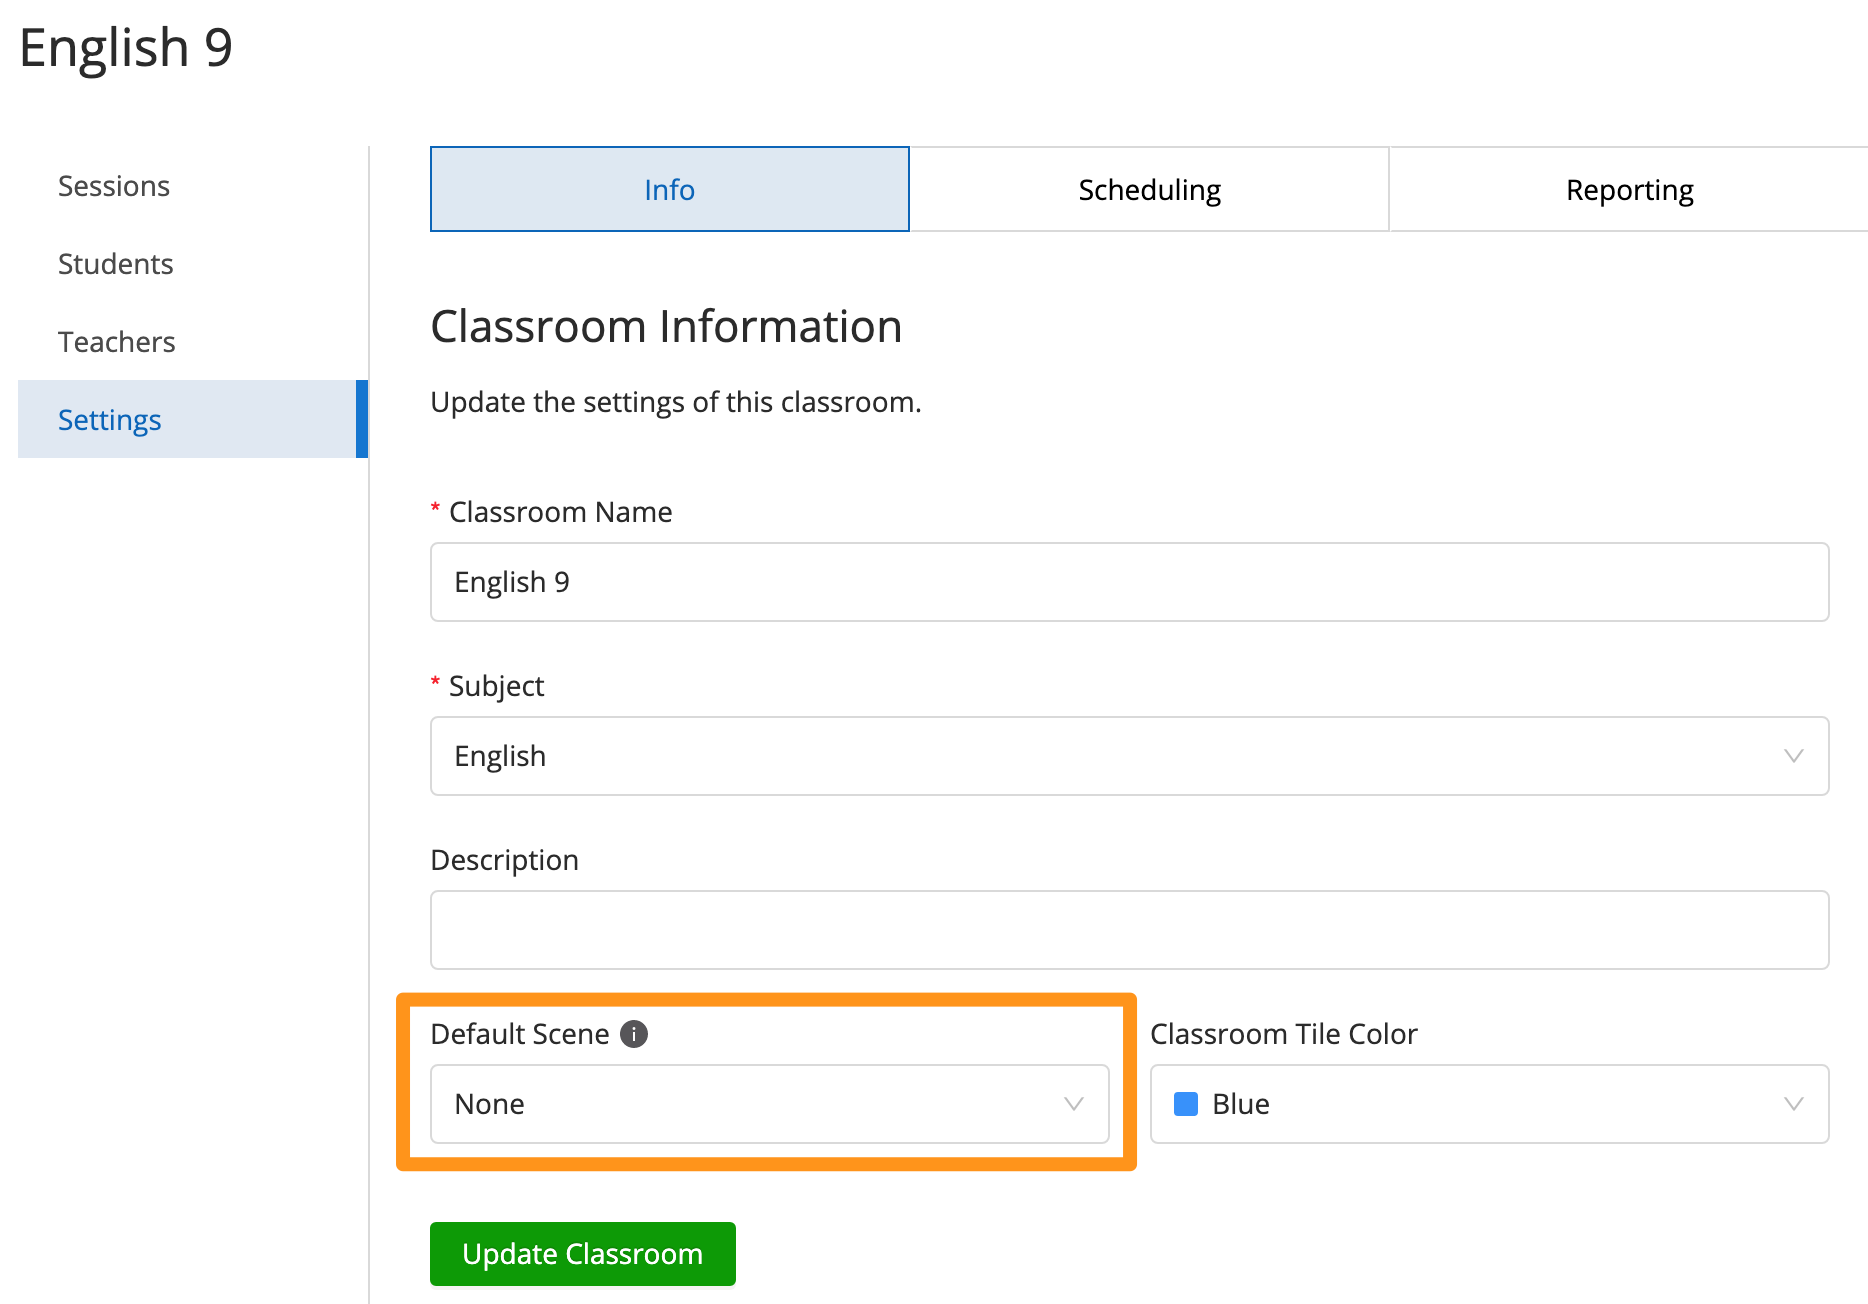
**Setting a Default Scene to Always Apply at the Start of a Session**
- From your Teacher Dashboard, find the classroom that you wish to have a Default Scene applied and click **Settings**.
- Under the Info tab, find the **Default Scene** drop-down menu and select a Scene
- Click **Update Classroom** to save your changes
# Create a "No Access" Scene (Internet Completely Blocked)
##### **Create a "No Access" Scene**
##### For students to be completely blocked when they arrive to class, create an Allowed List Scene.
##### You then just need one website in your allowed website list - it could be any random site that is NOT whitelisted.
##### Then the "No Access" Scene will activate as no access to the Internet when applied to students.
# Use Teacher Commands During Class Sessions
Teacher commands can be used to interact with your students during active classroom sessions.
# Lock / Unlock Screen
The lock screen command will **mute** and **disable all Chrome windows** on your student's device. The command is designed to unlock at the end of the session, but if a student joins a new session before the first session ends, they will remain locked.
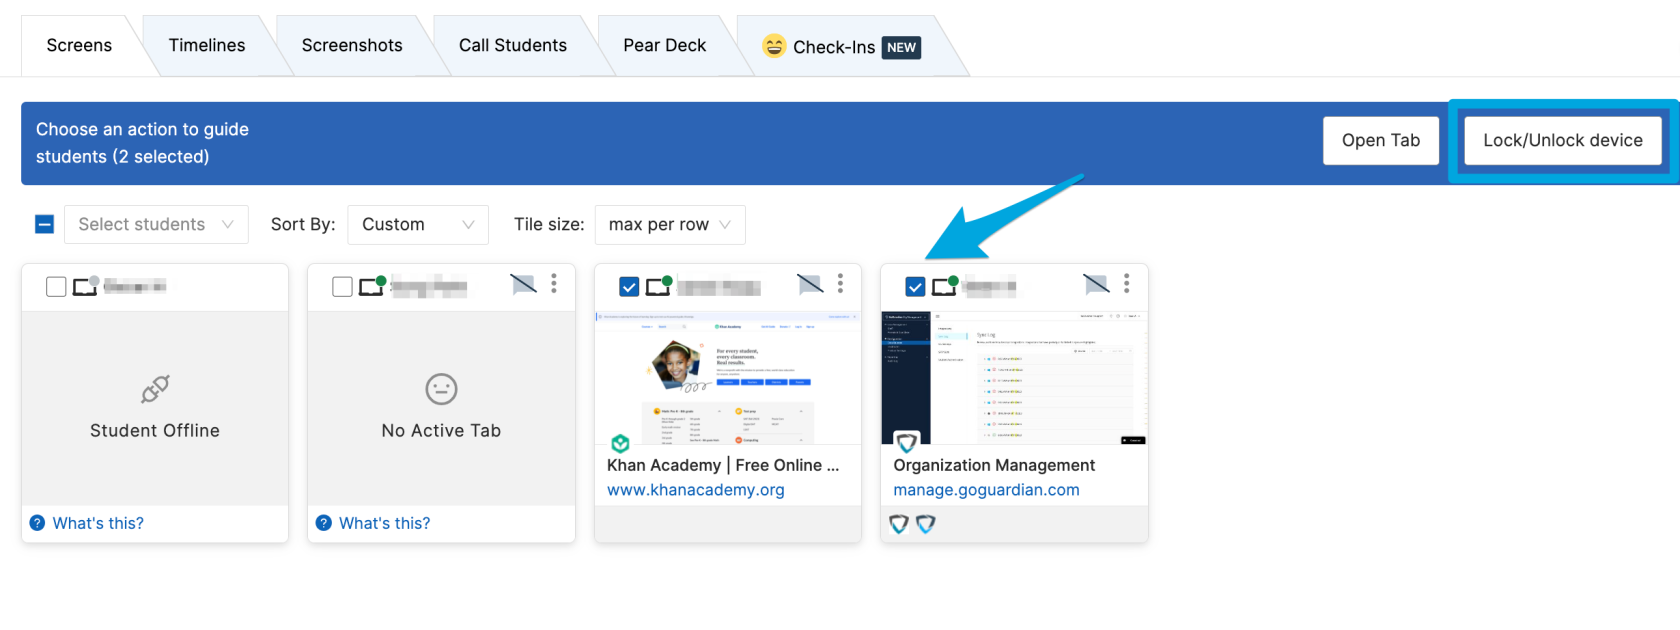
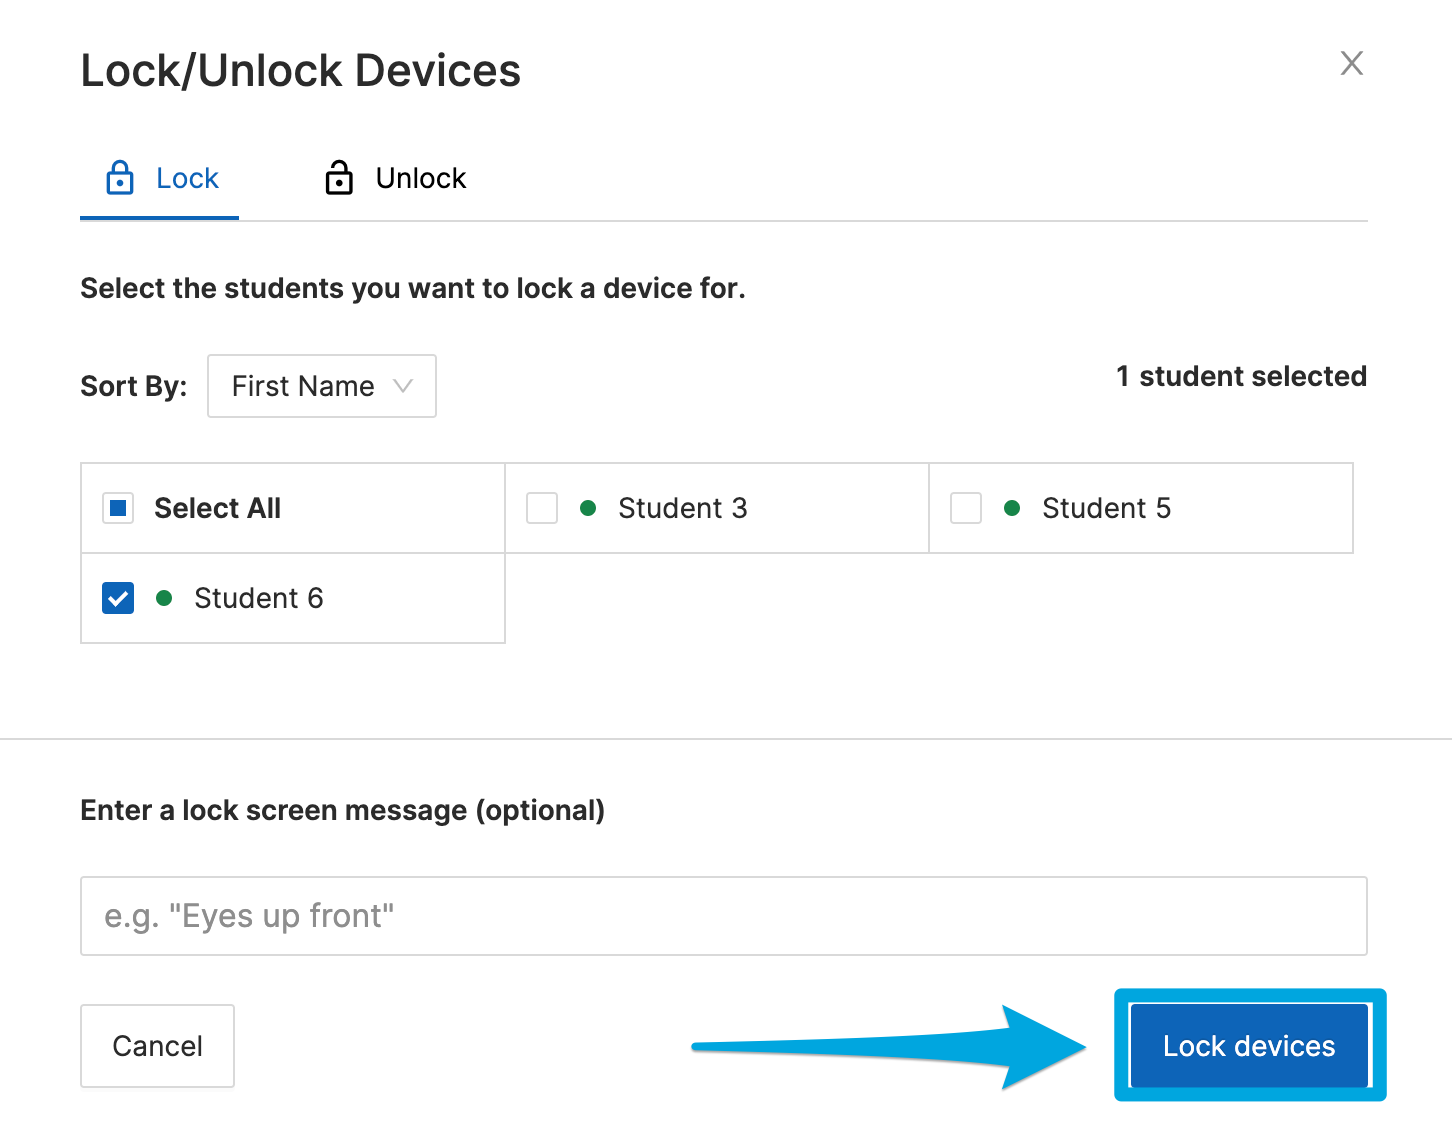
##### **To lock a student's screen:**
1. Select one or more students using the checkbox to the left of each student's name
2. Click the **Lock / Unlock device** button
3. (Optional) enter a custom message to be displayed on the locked screen
4. Click **Lock** devices on the **Lock / Unlock** Devices confirmation popup window
Devices may also be locked or unlocked by clicking the Lock / Unlock device button on the command bar and then making lock / unlock selections.
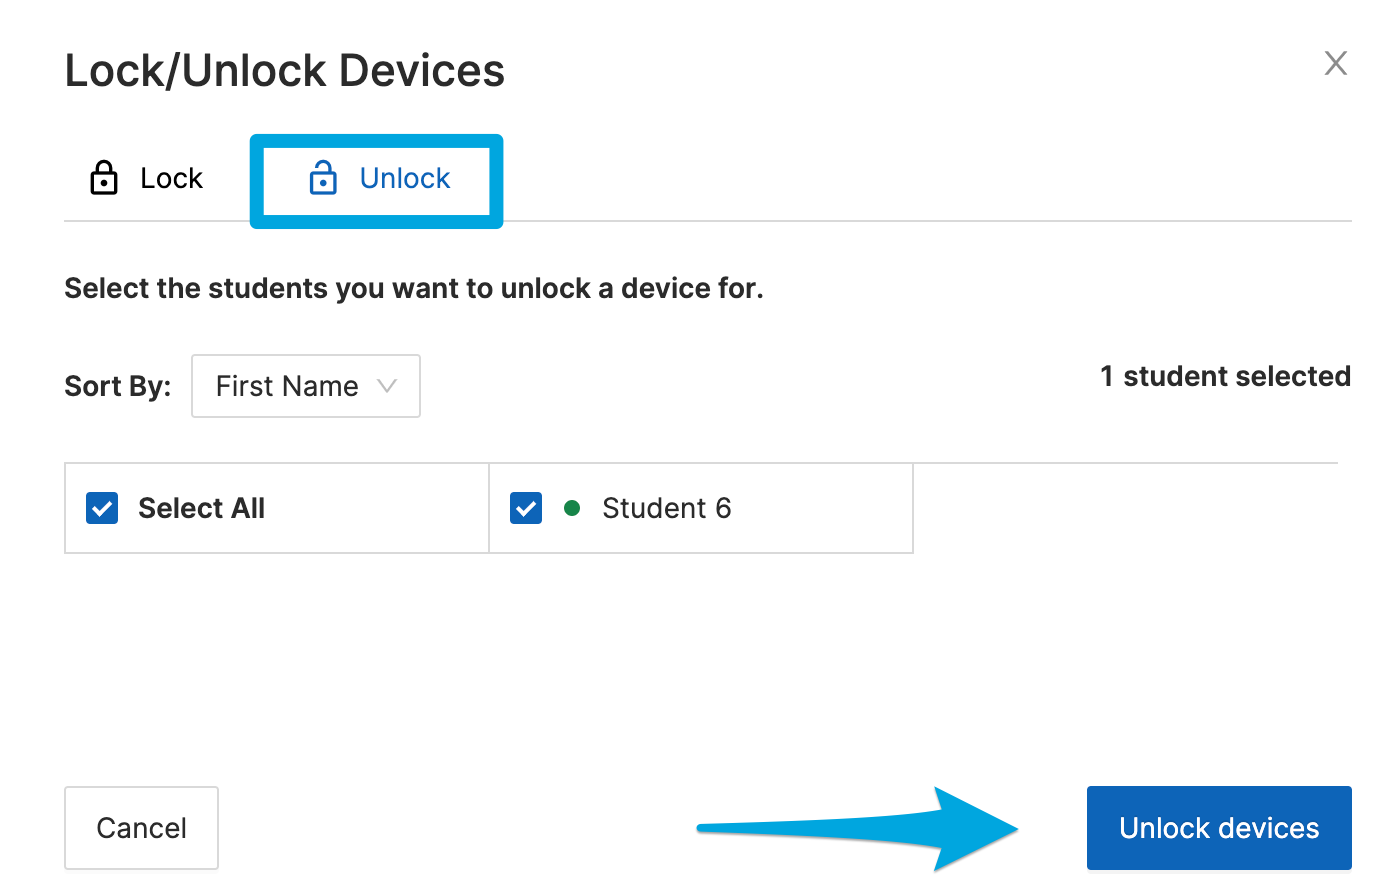
##### **To unlock a student's screen:**
1. Select one or more students using the checkbox to the left of each student's name
2. Click the **Lock / Unlock** device button
3. On the **Lock / Unlock** devices popup window, click the **Unlock** button
4. Confirm by clicking the **Unlock** devices button
If the student's device does not unlock after 30 seconds, reboot the student's device, wait for the student to connect to the session, and then issue the unlock command again.
# Open / Close Tab
The Open Tab command allows teachers to direct students to any web page by entering a URL to be opened on the selected student's screens.
##### **Opening a Tab for Multiple Students**
1. Click the **Open Tab** button
2. Check the boxes next to **Select All** or choose specific students and click **Next**
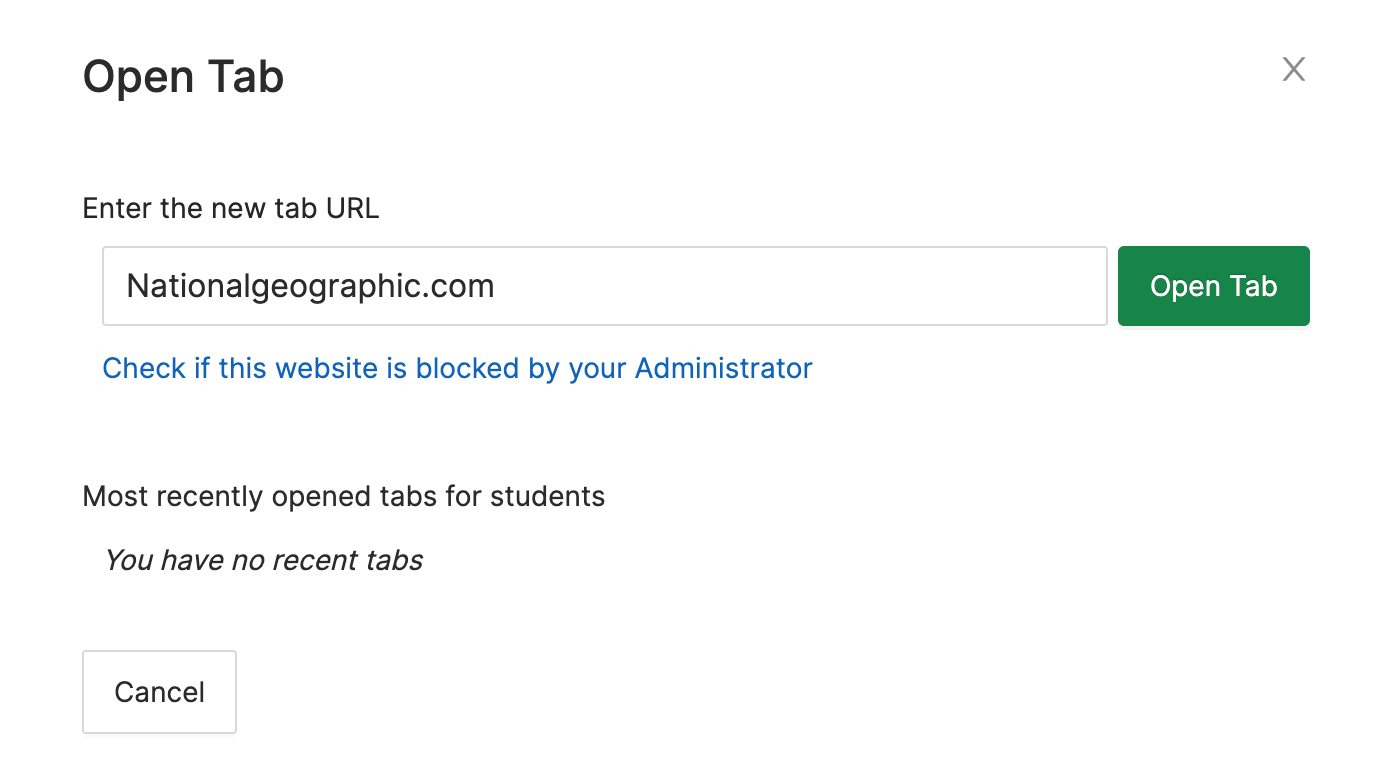
3. Enter a URL in the Open Tab interface and click **Open Tab**
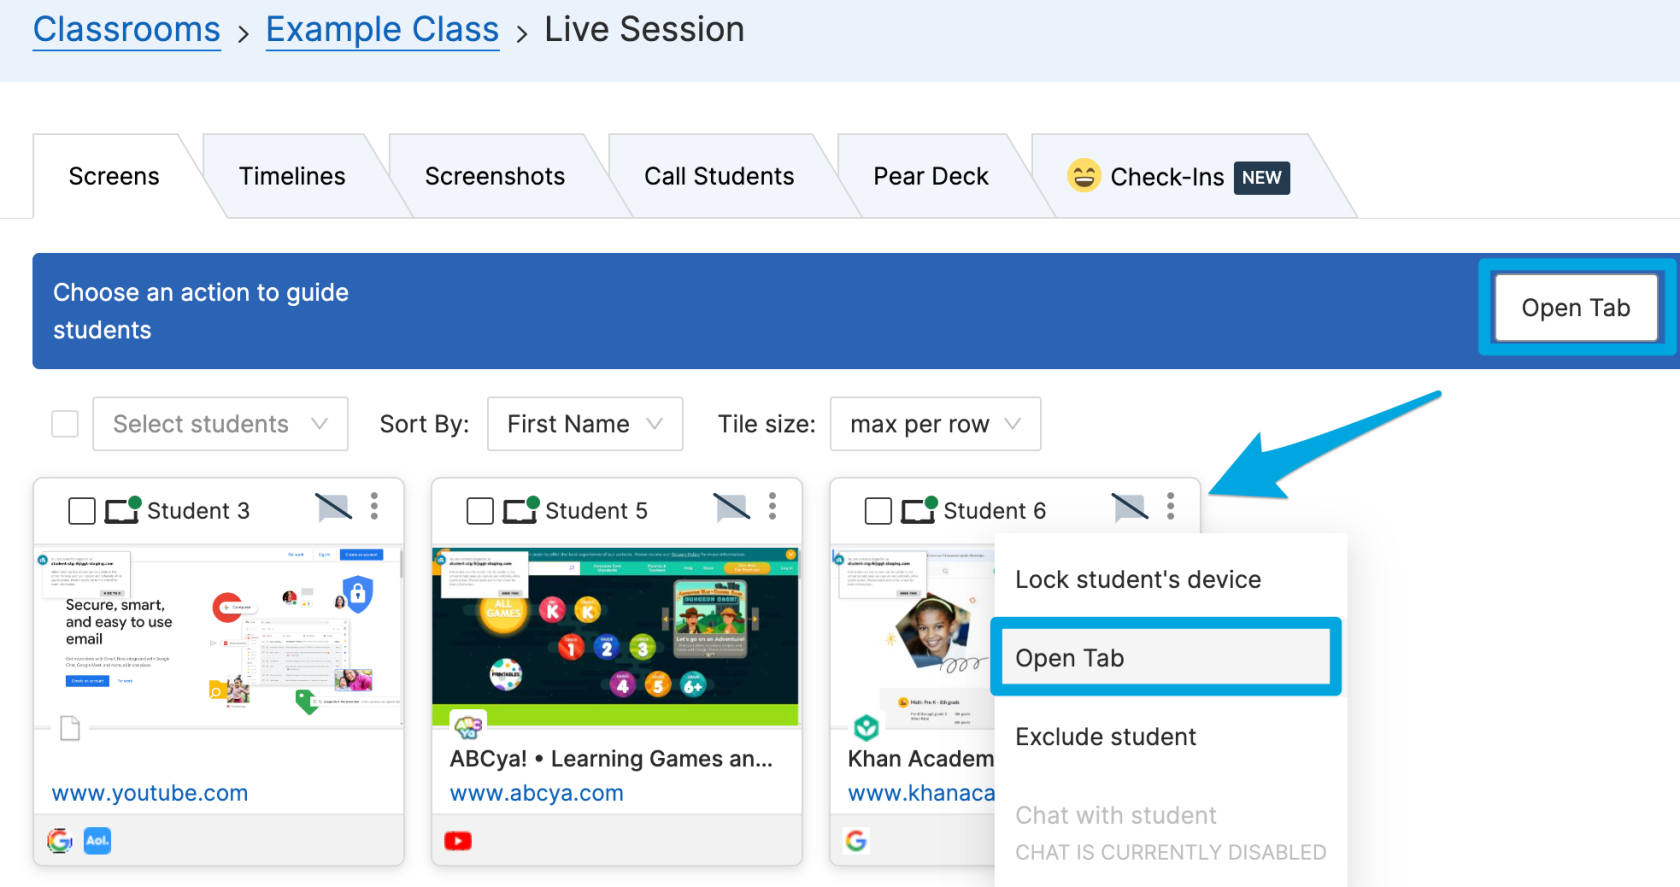
Opening a Tab for One Student
1. Click the 3 dots button in the corner of a student's tile
2. Select the **Open Tab** button
3. Enter a URL in the Open Tab interface and click **Open Tab**
##### **To close a tab:**
1. Click on a student's tile (their screen view)
2. Identify the tab you would like to close on the list
3. Click **Close** to the right of the URL
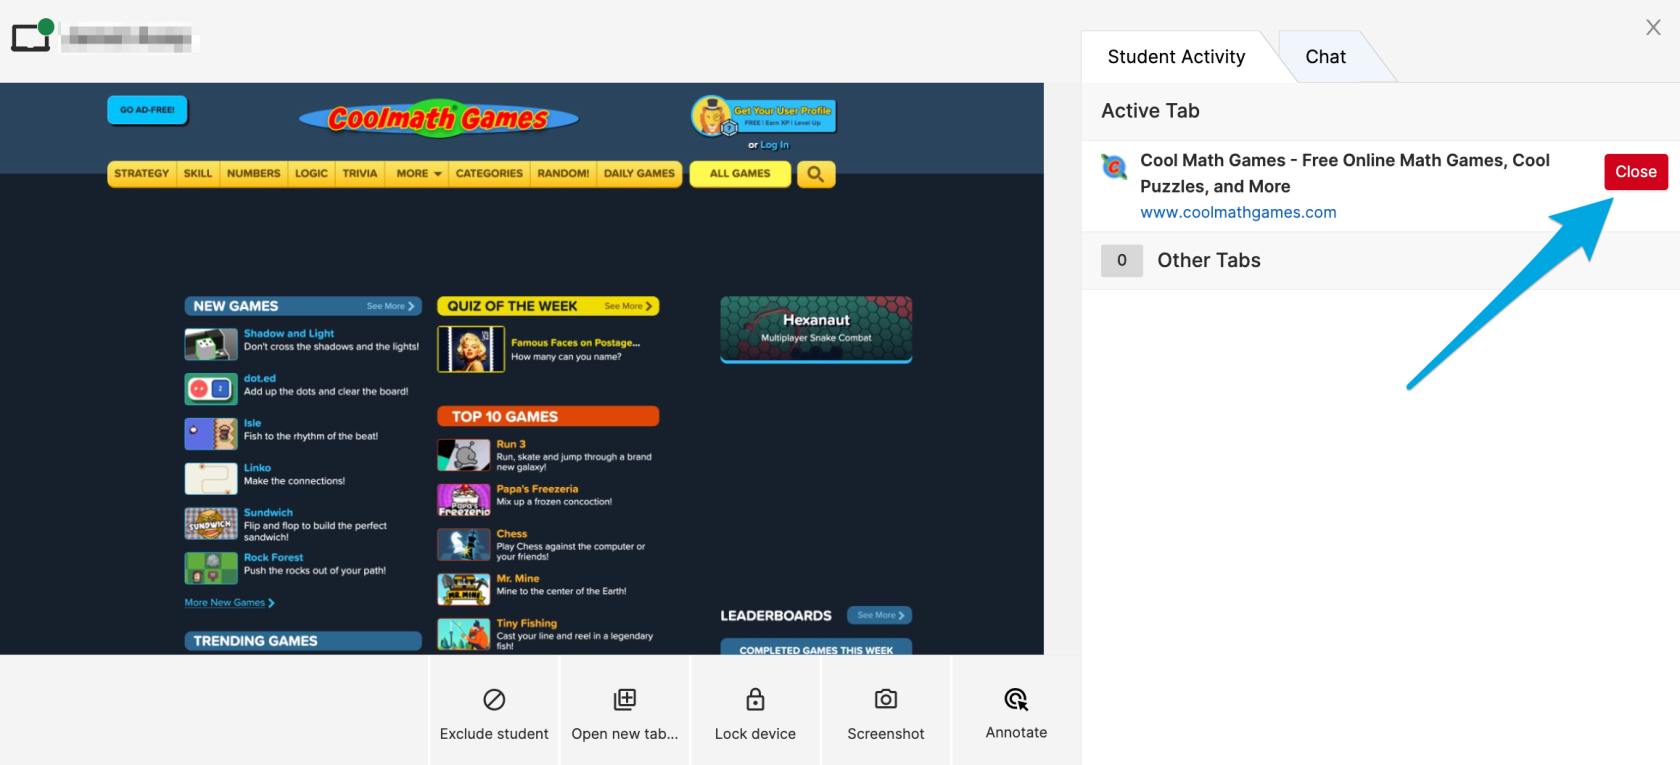
Note: It can take up to 10 seconds for the closed tab to disappear from your Teacher dashboard.
# Take a Screenshot
Using **Screenshot**, you can quickly document student screen activity to reference later. Screenshots are saved along with other past session data on the classroom's Sessions tab.
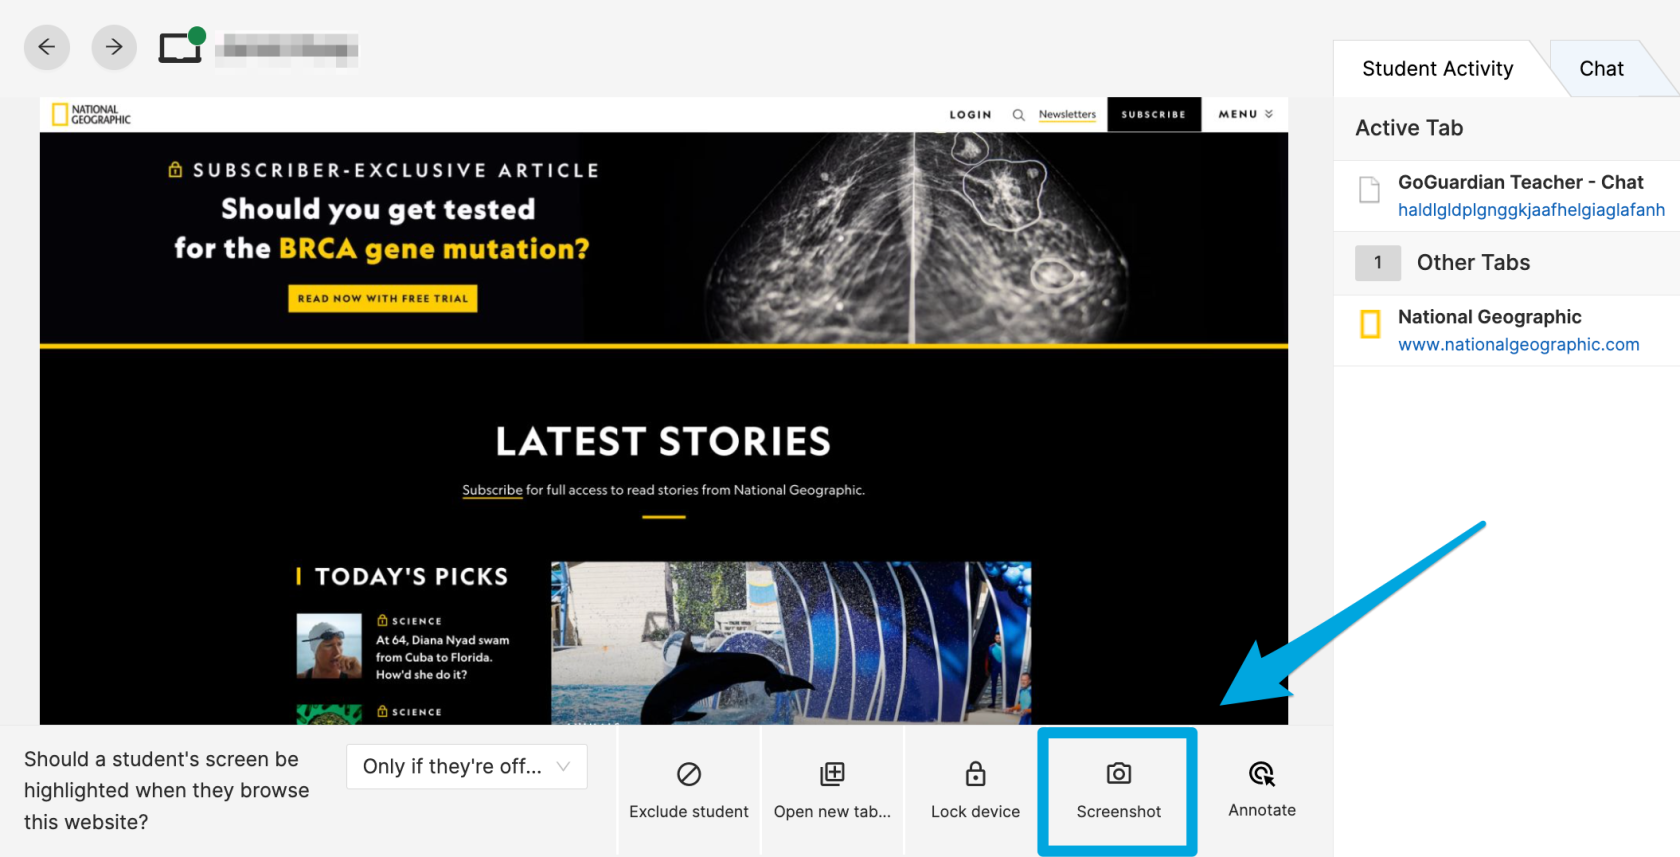
##### **To take a screenshot:**
1. Click the screen of the student
2. Click the camera icon on the bottom right corner
##### **To view screenshots from the current session:**
1. Click the Screenshot tab under the class name
2. Click Download Screenshot or save to Drive
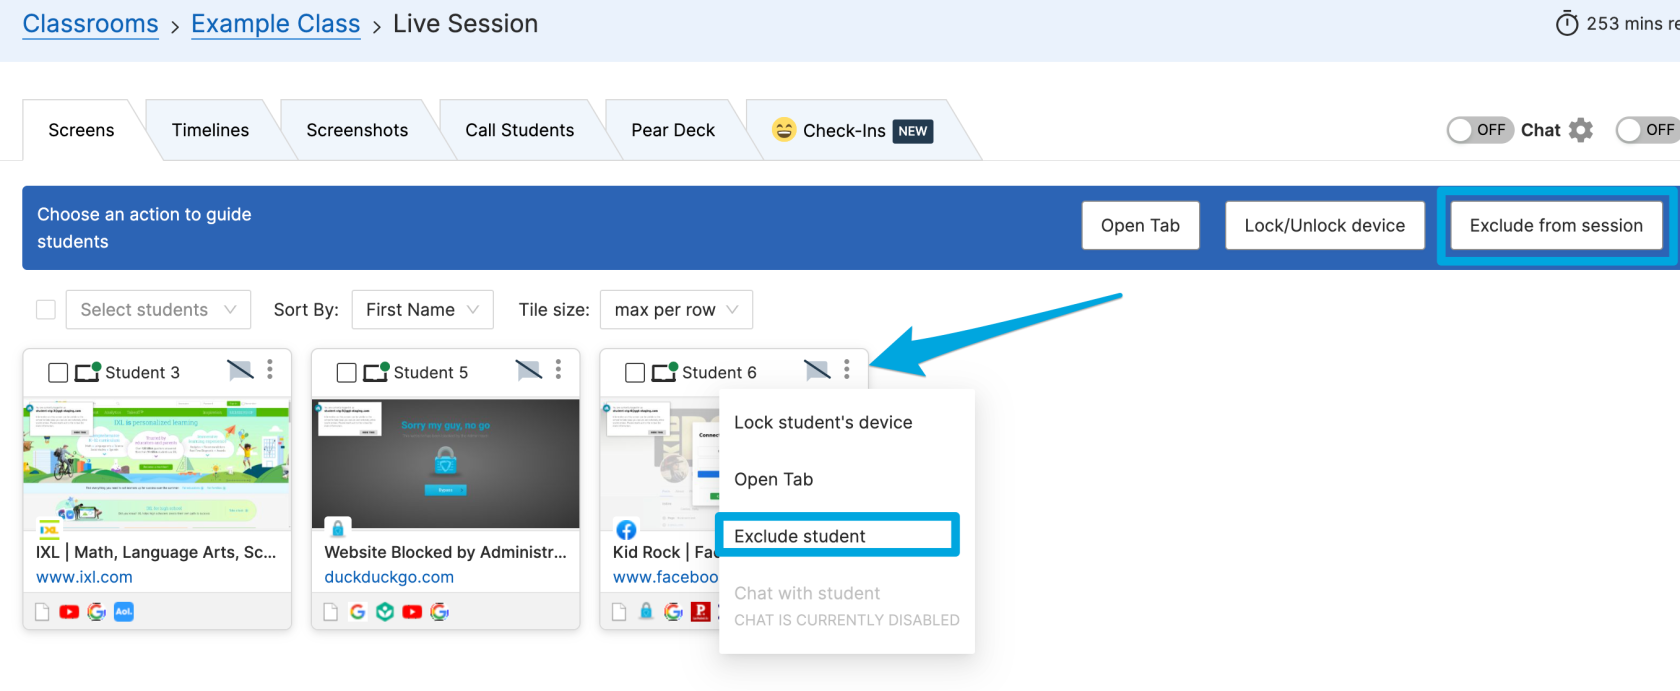
# Exclude and Include Students
Students who are absent can be excluded from your classroom session with the **Exclude** command. This command will temporarily hide the student from your Screens and Timeline views. Students can be excluded and re-included at any time during your session. Excluding a student will not delete them from your roster.
##### **To Exclude One Student:**
1. Click the 3 dots button in the corner of a student's tile
2. Click the **Exclude student** button
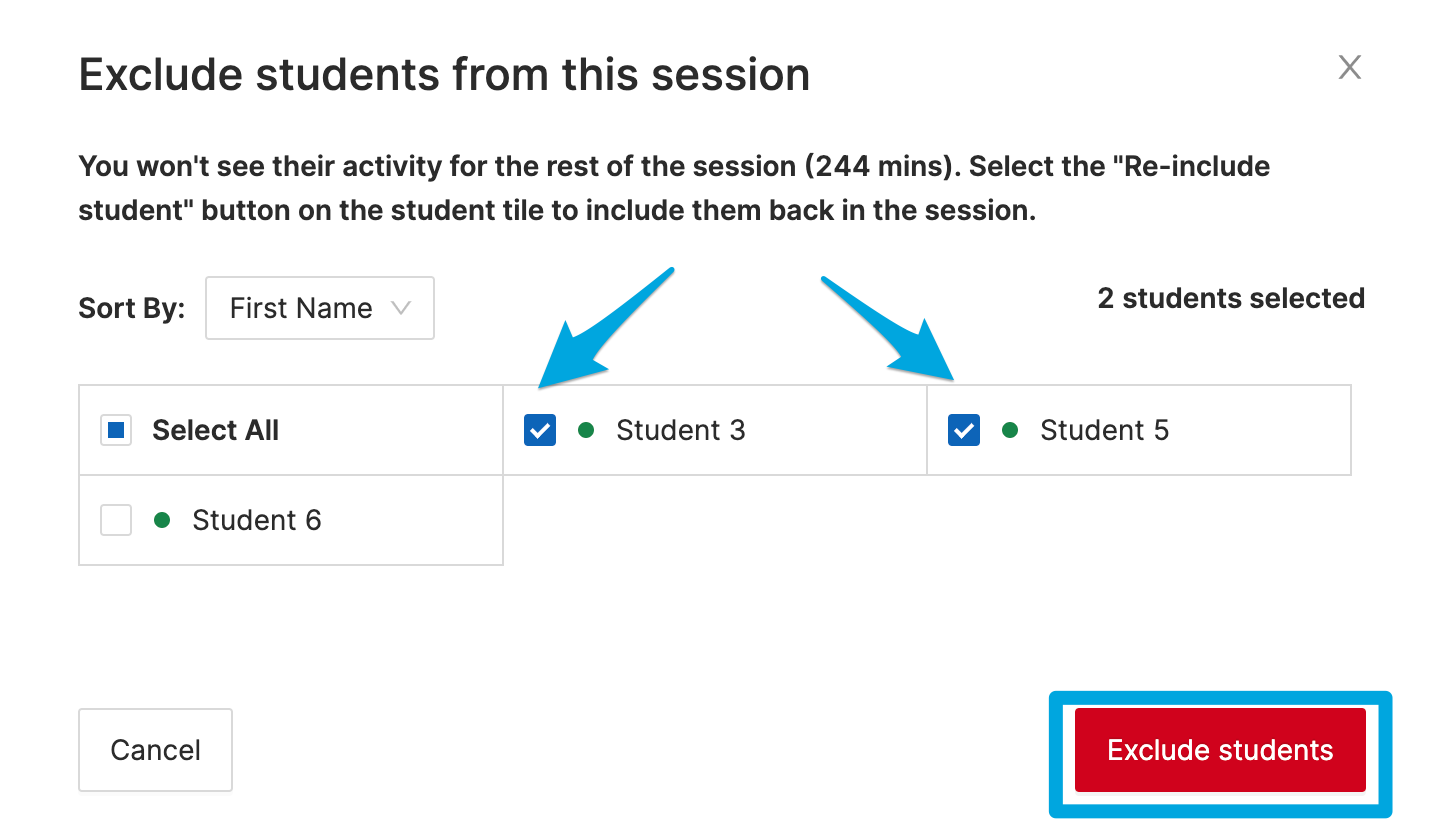
##### **To Exclude Multiple Students**
1. Click the **Exclude from session** button
2. Select All or check the boxes next to specific students
3. Confirm by clicking the **Exclude students** button
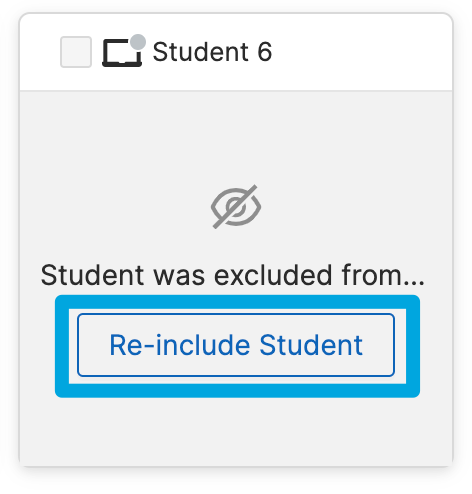
##### **To Include a Student:**
1. Find the excluded student's tile
2. Click the **Re-include Student** button
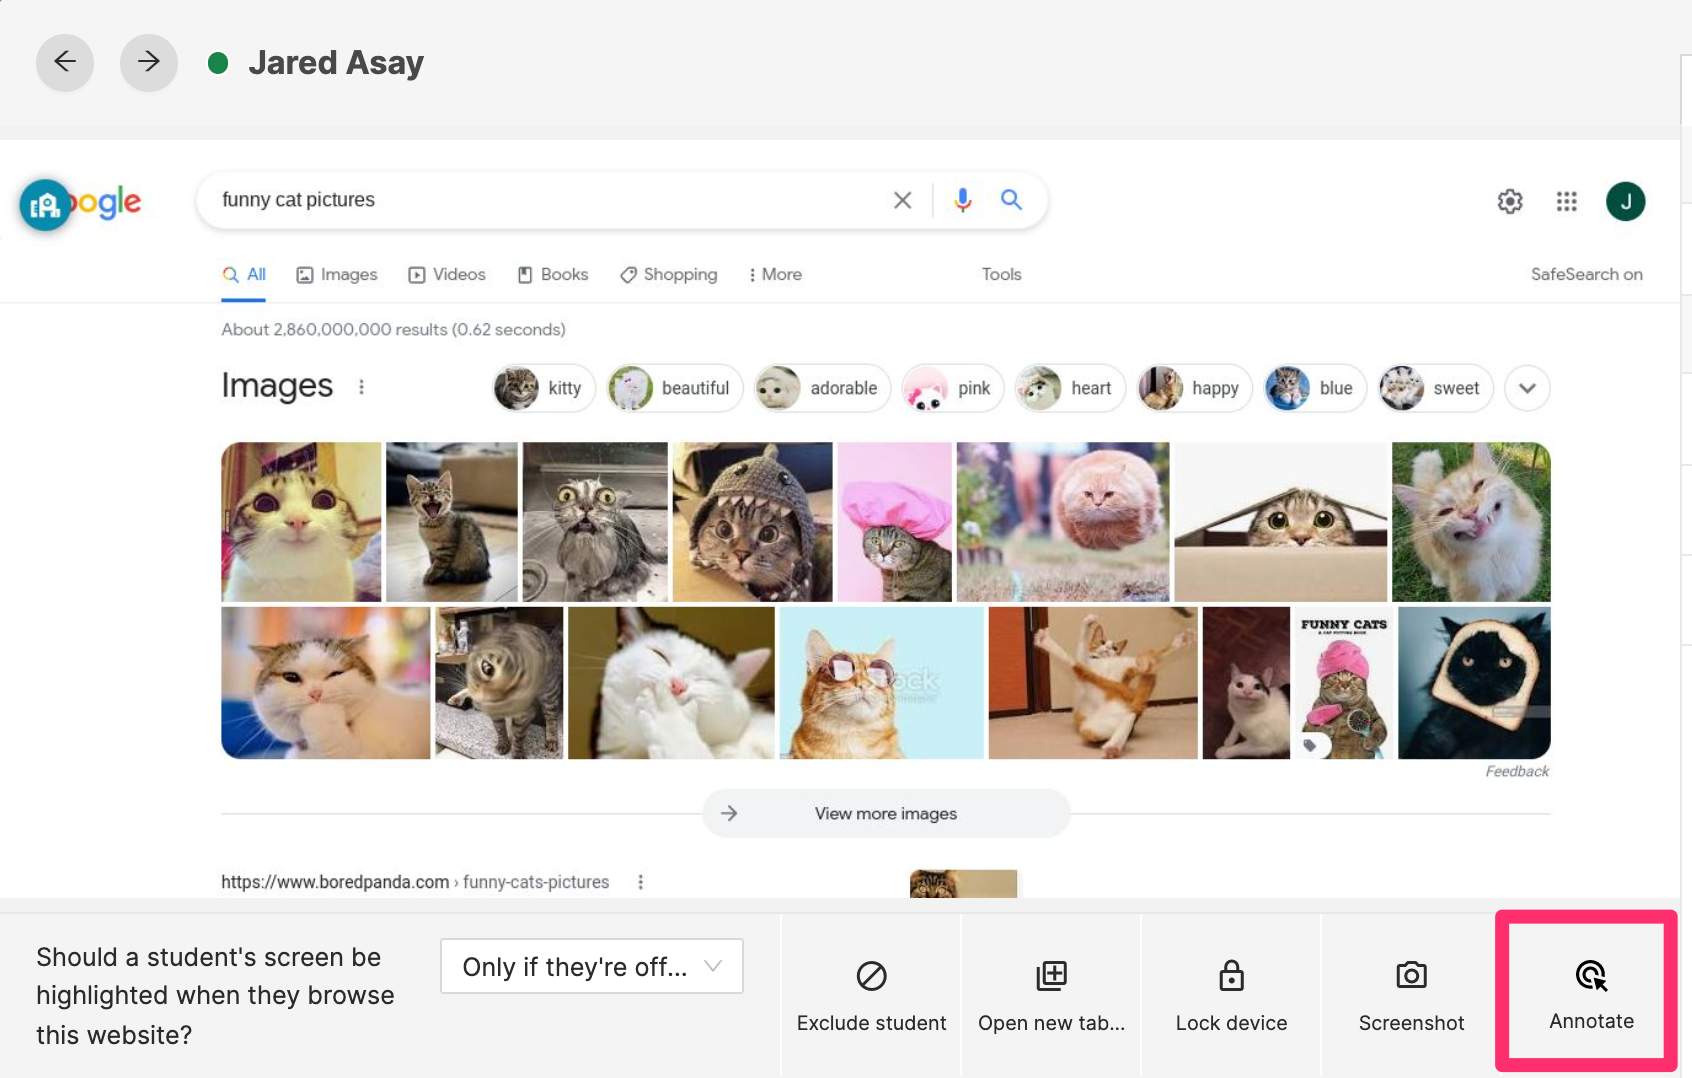
# Annotate
With the **Annotate Student Screen** feature, teachers can place a colored circle on the webpage that the student is currently browsing to help guide them. On the student’s side, the circle will appear for ~10 seconds and then disappear. Teachers may also change the color and size of the pointer by using the Pointer Color and Pointer Size options.
This option is available on the bottom right of a student's screen view:
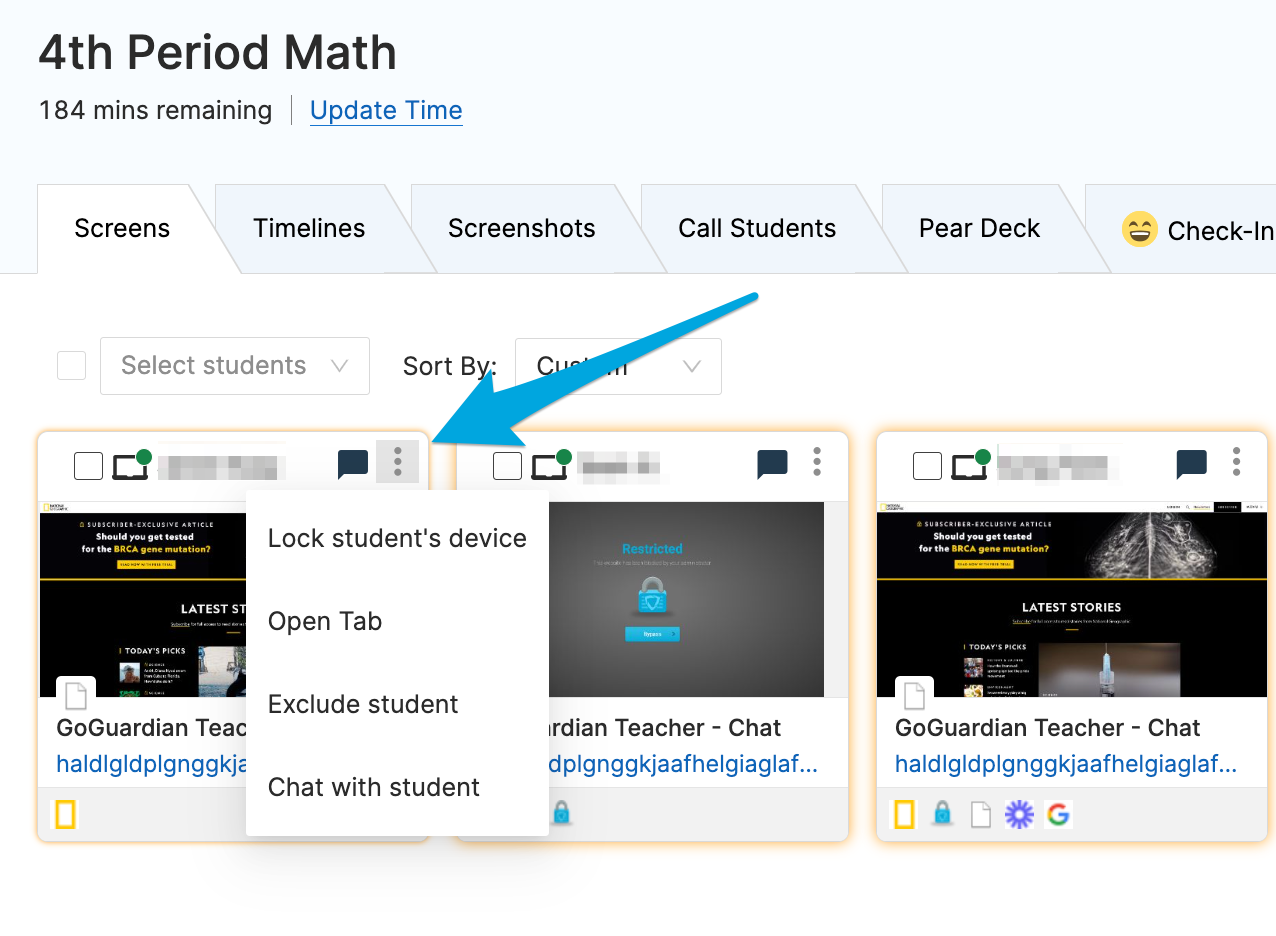
# Issue Individual Commands from a Student's Tile
Teachers can also issue the following commands to individual students by clicking on the three vertical dot menu in the top right corner of a student's tile:
- Lock / Unlock Screen
- Open Tab
- Exclude Student
- Start a Chat (if chat is enabled for the active session)
# YouTube
# How to Allow an Entire YouTube Channel
**If you want every YouTube video from a particular channel to be whitelisted, follow these steps (FYI this does not apply to playlists):**
1. With the YouTube video URL copied, paste it into the browser bar and press Enter. This will redirect to the YouTube video page with the full URL.

2. Click on the channel name below the video. This will redirect to the channel page for this YouTube channel.
3. Copy the URL at the top, which is the channel URL (it will have the channel in the URL):

4. Add the YouTube channel URL to the [Whitelisted Websites for MS Chromebooks](https://docs.google.com/spreadsheets/d/1NiKFzP97YExoZYlFvW6AfheHjpO5SIbA8mJHA9CDamg/edit#gid=0).
# How to Find a YouTube URL from an Embedded Video
**If a YouTube video is embedded in another site, follow these steps to find the URL of the specific video:**
1. Navigate to the site URL where the embedded video is getting blocked (i.e. Nearpod, Edpuzzle, Khan Academy)
2. Click play on the video (if the initial play button is not the red YouTube play button). Then click to pause the video.
3. Right-click anywhere in the video
4. Select "Copy video URL"
**(Steps 2-4 are shown below):**

5. With the YouTube video URL copied, paste it into the browser bar and press Enter. This will redirect to the YouTube video page with the full URL:

6. Add the full YouTube video URL to the [Whitelisted Websites for MS Chromebooks](https://docs.google.com/spreadsheets/d/1NiKFzP97YExoZYlFvW6AfheHjpO5SIbA8mJHA9CDamg/edit#gid=0).
# Quick Glossary Guide
**Classrooms** are a way to organize students that should be viewed at any given time.
**Sessions** are a digital equivalent of a classroom period. When a classroom session begins, all enrolled students will automatically join. Once the students are connected, teachers will begin to see live screen data populate.
**Timelines** are a way to view multiple students active tabs during a specific time in a session.
**Commands** can be used interact with students' devices during classroom sessions to open and close tabs, lock and unlock devices, and chat.
**Scenes** are a tool to apply in a session that regulate specific sites students are allowed to access during a classroom session.