Gradebook
- Set up and use your Gradebook (abbreviated version)
- Set up your Gradebook
- Entering Grades
- Publishing Grades
- Printing and Exporting Your Gradebook
- Managing Gradebook Sheet Settings (More Tools)
Set up and use your Gradebook (abbreviated version)
Set up your Gradebook
-
Teacher Tools -> Teacher Gradebook
-
Select Course (top right corner)
-
Type the class name under “Create a Sheet”
-
Edit the category names and assign them weights
-
To delete categories, click the X
-
To add categories, click “Add another category”
-
Scroll to the bottom and click the green “Create Sheet and Continue”
Create an Assignment
-
Click the blue “+ New Grade”
-
Fill out the Name, Date, Category, Subject, and Points
-
Click Continue
Enter Student Scores
-
Choose “Weighted” or “Google Classroom” sync
-
If Weighted, enter the students’ marks
-
If Google Classroom sync, select the same assignment from Google Classroom. Grades will automatically populate from Google Classroom into ParentLocker.
-
Click Save Grades at the bottom
Set up your Gradebook
ParentLocker’s Teacher Gradebook is a way for you to track your students' progress by recording the grades of assignments and
assessments, generating an average, and optionally sharing the information with parents.
- From the "Teacher Tools," select "Teacher Gradebook."

- On the right-hand side, you will see a dropdown menu titled "Select Course." Choose the course for the grade book you are setting up.

You've now "opened" your grade book, and are ready to enter the specifics of your class- the average calculations, grading system, etc. - Now that your grade book is "open", it's time to set up the 'Sheets' within it. Sheets are the individual "pages" within your grade book and are used to set a grading scale, grading categories, and more. There is no limit to the number of sheets allowed in a grade book. Sheets are one of the ways to organize your students' grades and performance. You can set up one sheet per unit taught, per month, or in whatever other configuration you'd like.
•If this is a “6th Grade Math” course, you might want a sheet for each grading term (e.g. “Trimester 1”, “Trimester 2”, etc)
•Alternatively, if you teach a course called “1st Grade General Studies” you might want a grading sheet for each subject (e.g. “Term 1 Math”, “Term 1 Science”, “Term 1 History”, “Term 2 Math”, “Term 2 Science”, “Term 2 History,” etc).
An opened Sheet in your Gradebook will look something along the lines of the image below: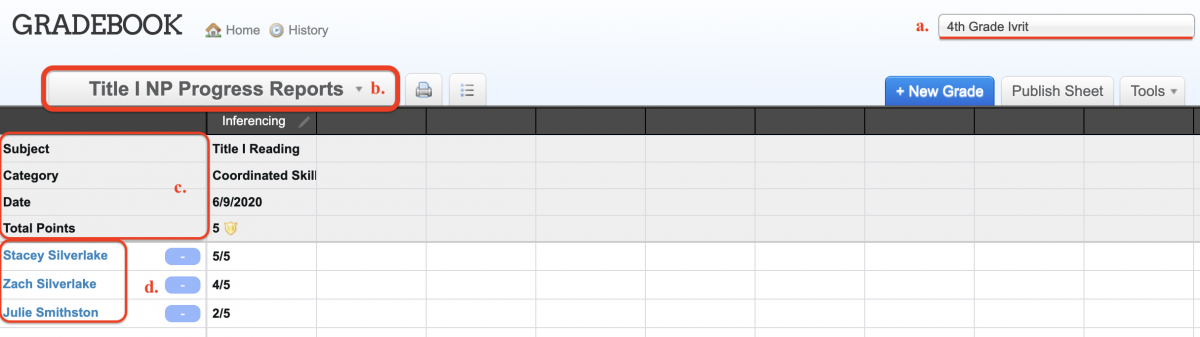
On the sheet are:a. The course at the top right corner of the sheetb. The name of the sheetc. The subject, category, date, and total points possible for the sheetd. A list of the students enrolled in the course, with their scores (as you enter them) in the columns that follow their names - To get started, name your sheet and select the term this sheet applies to - first term, second term, etc.

- Continue with selecting and creating the categories within your grade book. There will be several preset categories, but they can be easily changed by simply editing within the text box that has the category name or clicking the 'x' to the left of the category name to delete it. There is no limit to the number of categories you can add.

- Next to each category, give it a "weight" by using percentages to calculate how each one will calculate within the Gradebook sheet. Ensure that the percentages add up to 100. You can also select to drop any number of lowest grades per category, and whether each assignment within the category should be worth averaged equally.

- Select the calculation method for your sheet. Perhaps you don't work with averages, or you utilize standards-based assessment. Please note that you can only select one calculation method. If you have items that should be graded differently, you will need to create a separate sheet for them.

- Click "Create Sheet and Continue."

- Here is what a grade sheet with grades already entered looks like:

Entering Grades
After you've created a sheet, you can start entering grades.
- To add a new grade click
 on the top right side.
- Fill in the name, enter the date, and select the corresponding category (e.g. Quizzes - 15%) for this grade. Then choose the total possible points of this assignment.
Now press “Continue.”

- Here you have two options when entering grades for each student: “Percentage/Letter Grade” or “Weighted”:
•For “Percentage/Letter,” you can select a grade from 1% - 100% or from the grade options you defined when creating the sheet (A, B, C, etc).

•For “Weighted,” you will enter the number of points received out of the total possible.
For example, if you entered 20 as the total points possible, a student can receive "something out of 20." For example, 20/20 or 18/20.

- You can also mark a grade as “Late”, “Excused” or “Not Completed” where applicable. A grade marked as “excused” for a student will not be factored into the grade average.
- Finally, click “Save Grades.”
- Click the pencil icon next to each assessment to edit the scores, change, or delete.

Publishing Grades
By default, grades are only visible to teachers and administrators.
There are two ways of making grades visible to parents and students.
Publishing Grade Sheets
To publish the sheet, click ![]() . The button will be green when published and grey when not published.
. The button will be green when published and grey when not published.
Emailing Grades
Email Grades ![]() will allow you to email the grade for a specific assignment home to all the parents (each parent receives their child’s grade on that assignment in an email). This can be done whether or not the sheet is published
will allow you to email the grade for a specific assignment home to all the parents (each parent receives their child’s grade on that assignment in an email). This can be done whether or not the sheet is published
If you don’t want the whole sheet to be published and visible to parents but want to share specific assignments with
parents, you can Email Grades but not publish the sheet.

- You can manually withhold an email by unchecking the box to the left of the student's name. Uncheck any students whose parents you don’t want to receive the email. A student missing a grade on the assignment will have his or her name unchecked automatically.
- The grades you entered on the sheet will be shown. These are what will be sent in the email.
Note: Any changes here will only apply to what is sent in the email, and not actually change the grade on the sheet. - You may add a comment in the “Include Comment” text box for each student.
- When you are done scroll to the bottom and click “Send Emails.” Each parent will receive their child’s grade and your comment (if entered) in an email.
- Click “Email Logs” to view a log of the grades you emailed out, as well as records of which parents viewed the email and which haven’t.
Printing and Exporting Your Gradebook
There are different options for viewing and exporting your Gradebook.
Print and List Views
Print view ![]() will render a printable version of the sheet, keeping its grid layout.
will render a printable version of the sheet, keeping its grid layout.
Dropped grades and category averages will be visible here.

List view ![]() will provide the grades in a list format, with each student’s grades on a page. This is useful for printing and giving the grades to parents, such as at Parent-Teacher Conferences. There is also a filter on the upper left-hand side which allows you to view only one student at a time.
will provide the grades in a list format, with each student’s grades on a page. This is useful for printing and giving the grades to parents, such as at Parent-Teacher Conferences. There is also a filter on the upper left-hand side which allows you to view only one student at a time.

PDF Download ![]() will allow you to download either the grid view or list view as a PDF format file.
will allow you to download either the grid view or list view as a PDF format file.
Excel Download ![]() will allow you to download the grades as a Microsoft Excel format file.
will allow you to download the grades as a Microsoft Excel format file.
Managing Gradebook Sheet Settings (More Tools)
There are additional tools for managing your Gradebook. These are not used on a day-to-day basis.
- The Settings button
 will allow you to go back to the sheet setup, where you can change the original sheet name, categories (weighting and dropped grades), and defined grade options.
 - You can “Archive” sheets (hide the sheet’s tab) by clicking the “More...” tab.
Then click “Archive Sheet” near the sheet you want to archive. This is useful for archiving old sheets. For example, archive the Term 1 sheets after the January break. You can restore archived sheets at any time. - The Delete button
 will allow you to delete the grade sheet entirely. You first need to delete all assessments on the sheet to delete the sheet.