ParentLocker
- Logging in to ParentLocker
- Connect your Google Classroom classes to ParentLocker
- Gradebook
- Set up and use your Gradebook (abbreviated version)
- Set up your Gradebook
- Entering Grades
- Publishing Grades
- Printing and Exporting Your Gradebook
- Managing Gradebook Sheet Settings (More Tools)
- Taking Attendance
- Send Class Mail
- Logging Parent Phone Calls (Notes)
- Posting Homework and More to Your Courses
- Create Lesson Plans
Logging in to ParentLocker
Log in to ParentLocker by going to mdy.parentlocker.com.
Use the Sign in with Google option and use your MDY email credentials.
Connect your Google Classroom classes to ParentLocker
ParentLocker lets you connect your ParentLocker courses to Google Classroom. Assignments, announcements, and grades posted in Classroom will automatically sync in ParentLocker, making it easy for you to manage coursework, post classwork, import grades, and engage students and parents.
To link your courses to Google Classroom, follow these steps.
- Click "Google Classroom Integration" in your Teacher Tools menu:

- Next, you will see a list of your ParentLocker courses.

- Click Setup on the top right. A popup will open up asking you to choose your Google account.
Make sure you select your school email address. - Next, authorize ParentLocker to access your Google Classrooms. Click Allow at the bottom of the
screen.

- Next, you will see a dropdown box next to each of your courses. Select the relevant Google
Classroom from the dropdown for each of your courses. - Click Save.
That's it! Your Courses and Gradebook will now sync with Google Classroom.
Gradebook
Set up and use your Gradebook (abbreviated version)
Set up your Gradebook
-
Teacher Tools -> Teacher Gradebook
-
Select Course (top right corner)
-
Type the class name under “Create a Sheet”
-
Edit the category names and assign them weights
-
To delete categories, click the X
-
To add categories, click “Add another category”
-
Scroll to the bottom and click the green “Create Sheet and Continue”
Create an Assignment
-
Click the blue “+ New Grade”
-
Fill out the Name, Date, Category, Subject, and Points
-
Click Continue
Enter Student Scores
-
Choose “Weighted” or “Google Classroom” sync
-
If Weighted, enter the students’ marks
-
If Google Classroom sync, select the same assignment from Google Classroom. Grades will automatically populate from Google Classroom into ParentLocker.
-
Click Save Grades at the bottom
Set up your Gradebook
ParentLocker’s Teacher Gradebook is a way for you to track your students' progress by recording the grades of assignments and
assessments, generating an average, and optionally sharing the information with parents.
- From the "Teacher Tools," select "Teacher Gradebook."

- On the right-hand side, you will see a dropdown menu titled "Select Course." Choose the course for the grade book you are setting up.

You've now "opened" your grade book, and are ready to enter the specifics of your class- the average calculations, grading system, etc. - Now that your grade book is "open", it's time to set up the 'Sheets' within it. Sheets are the individual "pages" within your grade book and are used to set a grading scale, grading categories, and more. There is no limit to the number of sheets allowed in a grade book. Sheets are one of the ways to organize your students' grades and performance. You can set up one sheet per unit taught, per month, or in whatever other configuration you'd like.
•If this is a “6th Grade Math” course, you might want a sheet for each grading term (e.g. “Trimester 1”, “Trimester 2”, etc)
•Alternatively, if you teach a course called “1st Grade General Studies” you might want a grading sheet for each subject (e.g. “Term 1 Math”, “Term 1 Science”, “Term 1 History”, “Term 2 Math”, “Term 2 Science”, “Term 2 History,” etc).
An opened Sheet in your Gradebook will look something along the lines of the image below: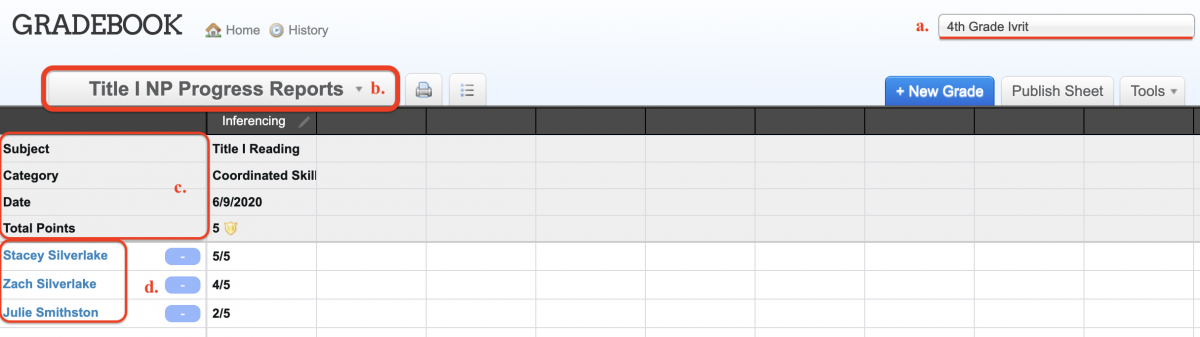
On the sheet are:a. The course at the top right corner of the sheetb. The name of the sheetc. The subject, category, date, and total points possible for the sheetd. A list of the students enrolled in the course, with their scores (as you enter them) in the columns that follow their names - To get started, name your sheet and select the term this sheet applies to - first term, second term, etc.

- Continue with selecting and creating the categories within your grade book. There will be several preset categories, but they can be easily changed by simply editing within the text box that has the category name or clicking the 'x' to the left of the category name to delete it. There is no limit to the number of categories you can add.

- Next to each category, give it a "weight" by using percentages to calculate how each one will calculate within the Gradebook sheet. Ensure that the percentages add up to 100. You can also select to drop any number of lowest grades per category, and whether each assignment within the category should be worth averaged equally.

- Select the calculation method for your sheet. Perhaps you don't work with averages, or you utilize standards-based assessment. Please note that you can only select one calculation method. If you have items that should be graded differently, you will need to create a separate sheet for them.

- Click "Create Sheet and Continue."

- Here is what a grade sheet with grades already entered looks like:

Entering Grades
After you've created a sheet, you can start entering grades.
- To add a new grade click
 on the top right side.
- Fill in the name, enter the date, and select the corresponding category (e.g. Quizzes - 15%) for this grade. Then choose the total possible points of this assignment.
Now press “Continue.”

- Here you have two options when entering grades for each student: “Percentage/Letter Grade” or “Weighted”:
•For “Percentage/Letter,” you can select a grade from 1% - 100% or from the grade options you defined when creating the sheet (A, B, C, etc).

•For “Weighted,” you will enter the number of points received out of the total possible.
For example, if you entered 20 as the total points possible, a student can receive "something out of 20." For example, 20/20 or 18/20.

- You can also mark a grade as “Late”, “Excused” or “Not Completed” where applicable. A grade marked as “excused” for a student will not be factored into the grade average.
- Finally, click “Save Grades.”
- Click the pencil icon next to each assessment to edit the scores, change, or delete.

Publishing Grades
By default, grades are only visible to teachers and administrators.
There are two ways of making grades visible to parents and students.
Publishing Grade Sheets
To publish the sheet, click ![]() . The button will be green when published and grey when not published.
. The button will be green when published and grey when not published.
Emailing Grades
Email Grades ![]() will allow you to email the grade for a specific assignment home to all the parents (each parent receives their child’s grade on that assignment in an email). This can be done whether or not the sheet is published
will allow you to email the grade for a specific assignment home to all the parents (each parent receives their child’s grade on that assignment in an email). This can be done whether or not the sheet is published
If you don’t want the whole sheet to be published and visible to parents but want to share specific assignments with
parents, you can Email Grades but not publish the sheet.

- You can manually withhold an email by unchecking the box to the left of the student's name. Uncheck any students whose parents you don’t want to receive the email. A student missing a grade on the assignment will have his or her name unchecked automatically.
- The grades you entered on the sheet will be shown. These are what will be sent in the email.
Note: Any changes here will only apply to what is sent in the email, and not actually change the grade on the sheet. - You may add a comment in the “Include Comment” text box for each student.
- When you are done scroll to the bottom and click “Send Emails.” Each parent will receive their child’s grade and your comment (if entered) in an email.
- Click “Email Logs” to view a log of the grades you emailed out, as well as records of which parents viewed the email and which haven’t.
Printing and Exporting Your Gradebook
There are different options for viewing and exporting your Gradebook.
Print and List Views
Print view ![]() will render a printable version of the sheet, keeping its grid layout.
will render a printable version of the sheet, keeping its grid layout.
Dropped grades and category averages will be visible here.

List view ![]() will provide the grades in a list format, with each student’s grades on a page. This is useful for printing and giving the grades to parents, such as at Parent-Teacher Conferences. There is also a filter on the upper left-hand side which allows you to view only one student at a time.
will provide the grades in a list format, with each student’s grades on a page. This is useful for printing and giving the grades to parents, such as at Parent-Teacher Conferences. There is also a filter on the upper left-hand side which allows you to view only one student at a time.

PDF Download ![]() will allow you to download either the grid view or list view as a PDF format file.
will allow you to download either the grid view or list view as a PDF format file.
Excel Download ![]() will allow you to download the grades as a Microsoft Excel format file.
will allow you to download the grades as a Microsoft Excel format file.
Managing Gradebook Sheet Settings (More Tools)
There are additional tools for managing your Gradebook. These are not used on a day-to-day basis.
- The Settings button
 will allow you to go back to the sheet setup, where you can change the original sheet name, categories (weighting and dropped grades), and defined grade options.
 - You can “Archive” sheets (hide the sheet’s tab) by clicking the “More...” tab.
Then click “Archive Sheet” near the sheet you want to archive. This is useful for archiving old sheets. For example, archive the Term 1 sheets after the January break. You can restore archived sheets at any time. - The Delete button
 will allow you to delete the grade sheet entirely. You first need to delete all assessments on the sheet to delete the sheet.
Taking Attendance
You will be using ParentLocker to record daily attendance. Follow these steps to get started.
- Under “Teacher Tools” on the top navigation bar, click “Take Attendance.”
The Attendance page will open up and default to today’s date.

- On the left side of the page, select that period's class.

- Mark any attendance issues by clicking the appropriate box next to each student’s name.

- Click “Save Attendance” at the bottom to save the attendance records.
Don’t forget to click Save at the bottom!
Send Class Mail
ParentLocker’s Class Mail module allows you to effortlessly communicate with your students and their parents via e-mail.
- Under “Teacher Tools” on the top navigation bar, click “Send Class Mail.”

- Navigate through each tab of the Send Class Mail page.

-
In the first tab, “Recipients,” check off what list you want the message to go to. By default, the courses you teach will be there as lists to check off.
Tips
•You can check off as many lists of recipients as you want.
•If you want to add additional recipients, click “Add More” and search for additional recipients by name.
•To create a new list that will appear as a checkbox every time you send an email, click “Create New List.” Enter a name for this list in the box that appears, and select people to include in that list.
•Even if there is a recipient/email address that is in multiple lists you check off to send to, the recipient will only receive the email once.
•Recipients will not see who else the email was sent to. - In the “Headers” tab, select how you want your name to appear in the email, type the subject of the email, and enter the reply-to address. This is the email address you want any replies to go to (usually your email address).
- In the “Message” tab, enter the text of your email. You can format the text of the email (font, size, colors, bold, bullets, etc.) using the toolbars at the top.

Tips
•Click the Spellcheck icon to check for any spelling errors.
•The email will automatically begin with “Dear” followed by the recipient’s name (each recipient will receive a personalized email with their name). You can remove the personal greeting by clicking {remove} near “Dear {recipient}”.
•Add an image to the message body by clicking the icon in the toolbar and browsing your computer for an image.
 - In the "Attachments" tab, upload any files you want to include as attachments in the email.
Click “Include Files” and browse for files on your computer to attach. - Finally, click the “Preview & Send” tab to prepare for sending.
•First, click the “Preview” button to see what your email will look like when sent.
•If you’re satisfied, click the green “Send Email” button to send the email.
Otherwise, you can go back to previous steps to make adjustments.
•When you send, a progress bar will appear. Please note that it may take a minute or two to send the emails.

Logging Parent Phone Calls (Notes)
All parent phone calls are to be recorded in ParentLocker's Notes.
-
From Teacher Tools, go to Notes.

-
Click + New Note in the top-right corner.
- Choose a Category (i.e. Parent Contact) and then a Subcategory (i.e. Phone).
- Choose a Status. If it requires a follow-up or admin escalation, leave it Open. Otherwise, choose Closed.
- Give the note a Title (i.e. Phone call with Mom 8/30/24).
- Enter the Date and Time of the phone call.
- Start typing in the names of the Students this note pertains to. It can be one or more students.
- Write a Summary.
- Skip these fields.
- If you need to add another teacher or coach to the note, type in their name in the Staff Reviewers box.
- Scroll down to the bottom and Save the note.


Posting Homework and More to Your Courses
You can use ParentLocker to organize and share coursework and news with students and parents. From news posts and photos to homework, tests, quizzes, and files, ParentLocker will allow you to keep parents and
students informed and involved.
What you post in “Your Courses” will be included in each night’s Homework Email.
Items synced from Google Classroom will show up here as well and will be included in the daily Homework Email.
- Under “Teacher Tools” on the top navigation bar, click “Your Courses.”

The “Your Courses” page is divided into four tabs: Organizer, Newsboard, Files, and Photos. - The first tab is the Organizer. The Organizer is set up like a “daily planner,” where everything you post is included beneath the corresponding date. Because you are the teacher, you will see an area where you can post homework, assignments, tests, quizzes, and events.

When an assignment is shared with a course, it will be visible to students in the course and their parents on ParentLocker. It will also be sent to them in the nightly homework email: reminders for homework will be sent out on the night it is assigned for, and all other reminders (assignments, tests, etc.) will be sent out each night beginning a few days before they are due or occur.
To post in the Organizer:
•Choose the date of the homework/assignment/test/quiz/event you are posting
•Select which courses to share the post with. You can share with more than one course at once, if two or more of your courses have similar work
•Enter a title, description, and other details in the boxes that follow.
•Click “Include a File” if you want to upload a file to include with the post (for example, homework problems or an event schedule).
•Click “Post” -- it will now appear in your Organizer (and the Organizers of the students in the course(s) you shared it with)!

Tips
• You can edit or delete anything you post by hovering over the item and clicking the pencil icon that appears next to it.
• If you want to schedule an assignment but don’t want parents or students to see it in the organizer until a later date, click “Hide Until” and select the date on which to make the post visible to parents and students.
• Click the “Calendar View” button on the right side to see the Organizer in calendar format. - The next tab is the Newsboard. The Newsboard can be used to share news and updates with parents and students. For example, share classroom updates, blog posts, or various reminders. You can also post pictures to the Newsboard, so go ahead and post some pictures from class!

Newsboard posts will be visible to parents and students on ParentLocker, and will also be in that night’s Homework Email.
To post news:
• Select “Post Text” or “Post Picture” if you would like to upload a photo.
• If you chose “Post Picture,” upload a picture from your computer.
• Select which courses to share the post with. You can share the same post/picture with multiple courses at one time.
• Write some text in the box.
• Click “Include a File” if you would like to upload a file to include with your Newsboard post.
• Click “Post” -- your post will now appear on your Newsboard (and the Newsboards of the students in the course(s) you shared it with)! - The Files tab allows you to upload various files for parents and students to download from home. This is useful to post course syllabi, handouts, worksheets, and more.
Each course you teach will have its own folder:

Click a folder to view its contents. Within each folder, you can upload files and create new folders to organize your files using the “Upload” and “New Folder” buttons.

Anything in the course folder is visible to all parents and students in the course. Use the Files tab to organize all the course material and easily share files with parents and students. - You can use ParentLocker to share Photo albums with parents and students of your courses. Upload photos of classroom activities, trips, and more to keep parents engaged and involved.

To create an album click “Create a New Album,” choose which courses to share the album with, give the album a title and a description, and continue to upload photos.

Click “Add photos...” to add photos from your computer, and then “Start Upload” to upload them to ParentLocker. Finally, click “I’m Done Uploading” when you’re finished uploading.

On the Edit Album page, you’ll be able to choose an album “cover” photo, re-arrange the order of photos in the album, and delete or add any photos to the album.
Create Lesson Plans
ParentLocker has a lesson plans feature where you can add lesson plans for each week.
- From Teacher Tools, go to Lesson Plans

- Plans can be inputted per week, for each day of the week.
- Files can be uploaded to lessons, for example, handouts and worksheets relevant to each day (or an already created lesson plan in Word, Excel, PDF).
- Click Save Lessons when finished.
- Change the week in the top right corner
